Wine Braised Kale

Braised Kale

Thank goodness that the Holidays are over. I feel like I’ve been on a fast moving train for the last 2 months! I don’t know about you, but I love being home and settled into my routine. The Holidays always take me out of routine.  It’s nice to get out of routine, but it’s heaven to get back into routine also. While I’ve been away from you, I’ve been indulging in comfort foods, like stews in wine sauces! I love adding wine to sauces and stews. A wine sauce always makes me want to lick the plate clean! This recipe for Kale is so extremely yummy that if you’re not a Kale lover, you may just become a kale lover overnight! Kale gets a bad rap, I think it’s because most people don’t know how to cook it. People always pull me aside in the grocery store and ask me how I cook it. They whisper the question as if my responding answer will contain the secrets of the earth! Maybe for them it does. If you are not eating kale because you haven’t a clue how to make it, I hope that this recipe changes that!

Prep Time: 5 minutes
Cook time: 10-12 minutes

Ingredients:
1 bunch of Lancinto Kale washed and chopped finely
1/4 cup of shallots or brown onion finely chopped
1/4 cup or more of a good white wine (I used Sauvignon Blanc)
1 large clove of garlic sliced thinly
Sea salt and black pepper to taste
1-2 Tablespoons of olive oil

Directions:
Heat olive oil add garlic and shallots and  cook until you can smell the garlic, (20 seconds), add in kale, and sauté until wilted. Add in white wine, sea salt, and pepper, bring to a simmer and lower the heat. Cook covered for 5-7 minutes. It’s done when Kale is tender.

Roasted Chicken Thighs with Lemon and Oregano

Roasted Chicken Thighs with Lemon and Oregano

It is officially lemon season! I love lemons, I love the smell of them, the tastes of them, but most of all I love cooking with them. This recipe is perfect for the cold weather we are having here in California. Nothing warms up a house better than roasting chicken, and while I avoid using my stove  11 months of the year, I always love to use it in December. Maybe it’s the Christmas season, I don’t know, but there is just something about pulling something out of my actual oven  that makes me feel in tune with the season.

Prep Time: 5 minutes
Cook Time: 25 minutes
Total time: 30 minutes

Ingredients:
4 chicken thighs skin on
1 lemon divided in half with one half sliced thinly into rings and the other half cut into 2 wedges
1/4 cup of onion chopped finely
1 teaspoon of dried oregano
1/8 teaspoon of red pepper flakes
1/4 cup of white wine Sauvignon Blanc
1/2 cup of low sodium chicken stock
1 clove of garlic
3 tablespoons of olive oil
Sea salt & pepper to taste

Directions:
Pre-heat oven to 425 F. Add 1 tablespoon of the olive oil to a skillet. Season chicken with sea salt and black pepper, then add it skin side down to the skillet. Allow to brown, without turning for 10 minutes or until chicken is cooked half  through. Pour off excess oil, maintaining a thin layer of oil in the pan. Place half the lemon slices on the bottom of the pan, and the other half on top of the chicken.  Move the skillet to oven and allow chicken cook through about another 6-8 minutes. Remove chicken  from oven, and transfer to a plate. Add in the onion, oregano, garlic and red pepper flakes to the skillet and let cook for 2 minutes, remove the skillet from the fire, add in the wine and give a quick stir. Return the skillet to the fire  cook for 2 minutes and add the chicken stock cook for another 3 or the sauce has thickened a bit,  add in the remaining olive oil. Return the chicken to the skillet. At this point you can taste the sauce to see if you need more lemon, I usually add in the juice of one of the two remaining wedges. Add sea salt and black pepper if necessary,  serve and enjoy!

What is your favorite cold weather oven meal?

Follow and like me on Facebook: http://www.facebook.com/lazygirldinners

Roasted Cauliflower with Parsley Lemon Sauce

Roasted Cauliflower with Parsley Lemon Garlic Sauce

I love roasted Cauliflower, it’s one of my favorite side dishes. My daughter loves it too. Since we eat so much of it, I decided to try it with this little twist. I’m so glad I did because it is definitely something I will add to my arsenal of cauliflower recipes!

Prep time: 5 minutes
Cook time: 20 minutes
Total time: 25 minutes

Ingredients:
1 head of cauliflower roughly sliced
1 cup of flat leaf parsley
1/2 juice of a medium lemon
1 clove of garlic
6 tablespoons of olive oil
Sea salt and black pepper to taste

Directions:
Pre heat the oven to 425 F. Place cauliflower on a roasting sheet/pan toss with 4 tablespoons of olive oil, salt and black pepper, and roast for 15-20 minutes, or until cauliflower is fork tender and takes on a bit of color. While the cauliflower is roasting, place, the parsley, lemon juice, garlic, and remaining 2 tablespoons of oil in a small blender or processor and blend until it comes together. Season the sauce with sea salt to taste. Once the cauliflower is done, toss with 1 tablespoon of the sauce and reserve the rest to serve on the side.

Follow and like me on Facebook: http://www.facebook.com/lazygirldinners

Indian Spiced Cabbage

Indian Spiced Cabbage
 

I love cabbage! I wish more people shared my love for it. I say that because, it’s rarely on menu at restaurant’s, and when I go to a friends house for dinner, it’s rarely served. I don’t quite understand that, because it’s one of the most soul fulfilling veggies I know, in the same league as collard greens, and kale. I would happily eat it any day of the week! This is one of my favorite ways to prepare and eat cabbage! If you’ve ever been to an Indian restaurant then you’ve probably had this. It’s so quick to make at home that it’s almost an afterthought!

Prep time: 5 minutes
Cook time: 10 minutes
Total time: 15 minutes

Ingredients
1 small head do cabbage, chopped finely
1 teaspoon of black mustard seeds
1/2 teaspoon of ground turmeric
2 tablespoons of olive oil
Sea salt to taste

Directions:
In a cast iron skillet heat the oil along with the mustard seeds and turmeric, when the seeds begin to pop add in the the cabbage, cook for 10 minutes, allowing the cabbage to breakdown a bit. Add salt, toss, turn off fire, cover for 5 minutes, serve and enjoy!

What is your favorite cabbage recipe?
Follow and like me on Facebook: http://www.facebook.com/lazygirldinners

Braised Chicken in Caper Sauce

Braised Chicken in Caper Sauce

I love capers, something about their salty brininess speaks to my taste buds. This dish is so simple, and easy to make. All the work is in remembering that you’re cooking it, so that you don’t burn down the house!

Prep time: 5 minutes
Cook time: 25 minutes
Total time: 30 minutes

Ingredients:
1lb of chicken ( I used skinless, boneless thighs, you can use bone in with skin, but just be aware it will extend the cooking time a bit.)
1/3 cups white wine vinegar
1.5 cups of organic chicken broth
1/3 cup of capers drained and rinsed
1/2 cup of fresh parsley
1 medium onion
Sea salt and black pepper to taste

Directions:

  • Heat 2 Tbsp. oil in a large heavy skillet over medium heat. Season the chicken with sea salt and black pepper, then add the chicken and brown on both sides. Add in the  onion; cook, stirring often, until softened. Add the parsley, and capers to skillet; cook for 1 minute. 
     
     
    Stir in broth and vinegar.  Reduce heat to medium-low; cover and simmer until meat is tender and  cooked through falling off the bone, about 20 minutes.
  • Transfer chicken to a large platter. Spoon sauce over chicken; garnish with parsley.

How to roast chicken-Steps to making the perfect roast chicken everytime!

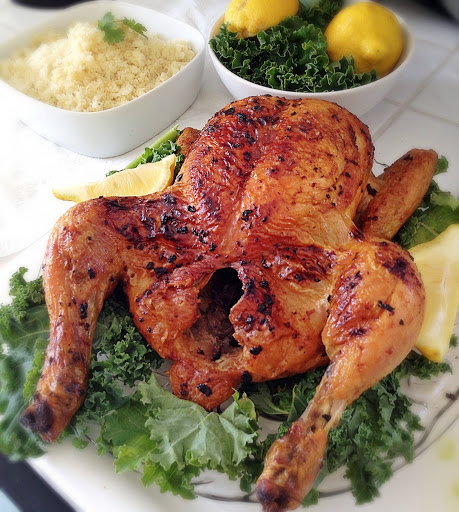
Lemon and Garlic Roast Chicken
Pin It!

Pin It!


Roasted chicken is universal. Almost every culture has some version of roasted chicken in their culinary history. However, as universal as roast chicken is, many still have a hard time making it. Just yesterday someone I follow posted a before and after picture of a roast chicken on Instagram. The bird was pasty before it went in the oven, and the bird was still pasty after it came out of the oven. I felt bad for this Instagramer because I’ve been there. The truth is that roasting a bird perfectly begins with steps that are made long before the bird goes in the oven. If you master these steps, I guarantee you that your roast chickens will come out of the oven, perfectly marinated, juicy and with a skin that is crackling and golden brown.

Step 1. Pick the right chicken! Organic, non GMO, and air chilled is the way to go! Why? Because conventional chickens are stored in salt water to plump them up before you buy them. A water logged chicken can taste good, but it will likely be harder to get a crispy crust on a water logged chicken, than one that is not water logged. Note: Read the label on the chicken, most chickens in the supermarket have  up to 4% retained water because they are dropped in a 34 degree chlorinated water bath before they are sold. Air chilled chickens are not exposed to water, so getting a crisp skin on an air chilled chicken is easier.

Step 2.  Brining! Most of you are probably thinking, “but you just said not to buy a water logged chicken, now you’re telling me to brine it?!” I said it, and I meant it!  There are other ways to brine without water.
Salt brining. This will change your life! Salt brining literally is what it sounds like, you thoroughly salt the chicken, put it in a Zip-Loc and let it sit over night. Salt does two things, it retains moisture and it pulls out moisture. This is a wonderful thing for a small bird like a chicken, because it doesn’t take longer than an hour to cook, so the amount of moisture it looses because of the salt brine is not significant enough for it to dry out. But it pulls out just enough moisture on the surface of the bird to make the skin crisp. At the same time it breaks down the protein, which means moist, tender, and well seasoned chicken!

Step 3. The skin needs to be rubbed with oil, not butter. Although butter tastes great, it contains 16-18% water and 80% fat. Water is an enemy to getting perfectly crispy skin on a roast chicken. If you want to use butter to flavor your chicken, then by all means do so. Just make sure to put the butter where it will do the most good..under the skin in the breast bone. If you want crisp brown skin, use oil, it does not contain water, it is 100% fat, so it will result in a chicken that is so beautifully brown, you may not want to cut it…note I said may not, after you get a whiff of the this delicious chicken all bets are off.

Step 4. Bake on a high temperature from the start. Most people reverse bake roast chickens, meaning they bake at a lower temperature for a longer period of time so the chicken doesn’t dry out, and then blast it at the end on a higher temp in hopes of browning the skin.  Seems plausible enough but results are often not consistent. Take my advice, bake your chicken on 450 degrees farenheight for 45 minutes to 1 hour, your chicken will come out perfect every time.

Recipe for brine
1.5 tablespoons of Sea salt or kosher salt for every 1 pound bird.

Sprinkle the salt all over the bird, place in a large bag and let sit over night. When your ready to cook it, add the oil and any herb you want–rub with a little garlic, bake it for 45 minutes to one hour, and Wah-La perfectly roasted chicken!

Dandelion Greens with Sautéed Mushrooms

Have you ever gone to the farmers market, and laid eyes on a vegetable and thought “that looks interesting let me try it?” We’ll that’s what happened to me this Sunday. I walked up to my favorite herb stand to get my usual arsenal of fresh herbs, and I stumbled upon some fresh dandelion greens. Sometimes I get so inspired by fresh veggies at the farmers market. I love trying new things. My love of trying new things can result in an amazing dish, as in this one, or a not so amazing dish. I had heard of dandelion greens before, but I had no clue how to cook them. So once the excitement of using this new leaf wore off, I was left to figure out what to do with these dandelion greens. I tasted the raw leaves…Big mistake! They are as my daughter would say “super duper, bitter.” They almost remind me of bitter gourd/melon.  But even these greens are not as bitter as bitter melon. I Googled them and found that dandelion leaves are actually weeds. You know those weeds that are growing in your vegetable garden? Yes those weeds, they’re edible…who knew? I decided I wanted to mellow out the bitterness, the best way to do that is to cook them. I got out some Crimini mushrooms, because mushrooms always make greens better, and some garlic and started my journey. I had no idea where I was going with this, but I can tell you that I ended up in taste bud heaven at the end of it all. Every element of this salad adds an additional flavor profile. This dish is filling, and gratifying on so many levels. I could eat it every day! If you can’t find dandelion greens, try substituting a hearty bitter green like beet greens, turnip greens or chard.

Here’s what you need:
1 bunch of organic Dandelion leaves, cut with bottom stems removed
10 ounces of Crimini Mushrooms sliced
2 Large cloves of garlic chopped finely
Handful of walnuts, toasted
1/2 cup of fresh cherry tomatoes sliced in half, I used fresh tomatoes from my garden
1/3 cup of goat cheese, or more if you are so inclined
1 teaspoon of butter
1 teaspoon of balsamic vinegar
Juice of 1/2 of a small lemon
2tablespoons of olive oil
Sea salt and pepper to taste

Directions:
Warm the olive oil and garlic in a sauté pan:

Once you can smell the garlic (20 seconds), add in the mushrooms:

Salt the mushrooms and allow to cook until just before the water from the mushrooms evaporates(5-7 minutes). Add in the tab of butter, and allow the mushrooms to brown and take on a bit of color. This step is important don’t skip it! Browning releases Unami flavor.

After the mushrooms have taken on some color add in the dandelion greens.

Sauté until wilted, then add in the balsamic vinegar and lemon juice:

Mix well, add in the tomatoes, toss for about a minute, turn off the fire:

Add in walnuts, and cheese, toss, season with salt and pepper and serve. This would also be good cold, but served warm this salad is super comforting and satisfying!

What have been some interesting farmers market finds for you?

Follow and Like me on Facebook: http://www.facebook.com/lazygirldinners.com