Fried Cauliflower Florets with Creamy Garlic Tahini Sauce


Fried Cauliflower Florets with Creamy Garlic Tahini  Sauce

Fried Cauliflower Florets with Creamy Garlic Tahini Sauce

Whenever I eat out at a Mediterranean restaurant, I find it hard to not just compose a meal from the appetizer menu.  With things like lentil soup, lemon and garlic potatoes, hummus and pita bread, fattoush salad, grape leaves, and fried cauliflower on the appetizer menu, who needs a full entree!  I often find myself struggling not to order one of every thing on the appetizer menu.  I usually settle upon the potatoes or the fried cauliflower.  The fried cauliflower is amazingly simple.  Unlike most fried things that come dusted in flour or some other type of breaded base, this doesn’t.  This recipe calls for only one ingredient, cauliflower!  The tahini sauce is great with this, but the cauliflower is pretty amazing on its own.  Your kids will love these cauliflower florets, mine did!

Pin It!

Pin It!


Prep time: 5 minutes

Cook time: 5-7 minutes

Ingredients:

1 small head of cauliflower

2 cups of grape seed oil or another high temp oil

Sea salt to taste

Ingredients Creamy Garlic Tahini Sauce

4 tablespoons of tahini paste

8 tablespoons of water

1 tablespoon of lemon juice, more if you like

2 cloves of garlic grated

Directions: Pre-heat the oil to 320F in a deep fryer.  Add ingredients for the tahini sauce to a small bowl and mix until well combined and creamy, then set aside. If you want this to be extra creamy, place all ingredients into a food processor or blender and blend until creamy, then transfer to a bowl.

image

Cut the cauliflower into florets.

image

Add the cauliflower florets to the deep fryer.

image


Fry until golden brown.

image


image

Transfer to a paper towel lined plate, season with sea salt, serve and enjoy!


image


image

Persian Spiced Salmon Kabobs

Persian Spiced Salmon Kabob's

Persian Spiced Salmon Kabob’s


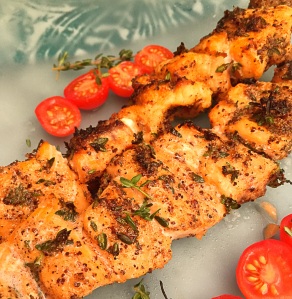
I love a good kabob and lately I’ve been craving them.  Salmon is such a hearty fish, and there are many great ways to prepare salmon, but when you want to switch things up a bit–grilled salmon is the way to go.  I made a paste to adorn this salmon, and it’s rich in Mediterranean flavors.  I used sumac, which can be found in any middle eastern store, or in your local Trader Joe’s–it’s where I got mine.  Sumac is tart,  sour and is often used in place of lemon in middle eastern recipes.   If you can’t find sumac, then by all means feel free to substitute with the zest of a lemon.  The flavor is this dish is fantastic.  The fresh thyme was amazing! I felt like I was eating at one of my favorite Persian restaurants.  Page really loved it, and my husband could not stop with the compliments.

Pin It!

Pin It!


Prep time: 5 minutes

cook time: 7 minutes

Total time: 12 minutes


Ingredients:

1lb of salmon– dried with paper towels, de-skinned, and cubed into 1 inch pieces

1 teaspoon of sumac powder– can substitute with lemon zest

1/2 teaspoon of garlic powder

1/2 teaspoon of cumin

1 teaspoon of fresh thyme-stems removed

1 teaspoon of olive oil–or oil of your choice

sea salt to taste

Directions: To a small bowl add the garlic powder, cumin powder, fresh thyme and oil, mix well and set aside.

image

Rub the spice mixture on the salmon,

image


then add the salmon to skewers,

image


Grill the salmon for 3-4 minutes on each side, remove from grill, serve and enjoy!

image


Pineapple Rings–How to make dehydrated Pineapple Rings

Dehydrated Pineapple Rings

Dehydrated Pineapple Rings

One of my go to snacks is dehydrated fruit.  I’m a particular fan of pineapple rings.  But, if you’ve ever purchased organic dehydrated pineapple rings, then you probably know that pineapple rings are a snack that can be out right expensive! I mean outlandishly expensive! On top of the expense, it’s pretty hard to find pineapple rings that haven’t been soaked in baths of sugar.  I’m not a fan of adding sugar to dehydrated fruit.  It’s sort of an oxymoron to me that sugar is added to dehydrated fruit at all, because if you know anything about dehydration–then you know that the sugar in fruits concentrate when dehydrated, so there really isn’t a need to add sugar–unless you’re dehydrating something really tart like cranberries then I could see the purpose of adding sugar. Last week I purchased a pineapple, I fully intended to eat it fresh. However,when I cut, and tasted it– it was pretty tasteless. Disappointing for sure. The pineapple clearly needed to ferment more.  Rather than chuck it, I sliced it and put it in the dehydrator and made pineapple rings. The resulting pineapple rings were not only flavorful, but they were sweet–everything you want would want in a fresh bite of pineapple–minus the juice of course.  The pineapple rings lasted all of 2 minutes, my sister in-law, my niece and Page, gobbled them right up–I’m pretty sure they would’ve passed on the fresh slices.

Pin It!


Prep time: 10 minutes

Cook time 6-8 hrs 10-12hr for thicker slices

Ingredients:

2 whole fair trade organic pineapple

Directions: Remove the stem from the pineapple, then slice off the top and bottom.  Slice off the skin, making sure to remove all the eyelets.

image

Now slice the pineapple thinly.

image

Keep in mind that the thicker you slice it, the longer it will take to dry.  If it’s too thin your pineapple rings will turn out crisp, if they are a bit thicker, they’ll be more leathery, so it’ just a matter of what you’re seeking in consistency.  After slicing, cut out the center core by carving a circular cut in the middle of the pineapple.

image

Remove the core and discard it.

image

Place the pineapple rings on your dehydrator sheet,

image

Set the dehydrator to 135F.  If you’re doing this in the oven, set the oven to 150F or the lowest possible setting.  Dehydrate for 6-8 hours, 10-12hrs if you cut thicker slices.

image

Once dry let cool, then enjoy!

image

Page could not wait for me to take a picture, she loves these so much!

image

image

if you like this recipe, try the recipe for my pineapple fruit roll-ups!

Green Bean Chicken

Green beans with Chicken

Green beans with Chicken

We are having a rough week here. Page is finding adjusting to school harder than any of us had hoped. She was fine initially, but has had a delayed reaction to being separated from me.  Yesterday was an especially hard day for us all.  She cried all day at school, and when I picked her up from school my heart just broke.  She looked like she had been crying all day, and the way she fell into my arms…let’s just say that I was reduced to one giant puddle! Needless to say, I never got around to posting my blog yesterday.

A few weeks ago we were out running the last of our Christmas errands, and stopped to eat a Chinese restaurant.  As we browsed the menu, I asked Page what she wanted to eat.  She quickly removed the menu from my hands, took a few seconds and said “I want the green beans mom!”  With her tiny finger she pointed to a picture of a plate of glimmering green beans and said ” I want this one!” Under normal circumstances I would ignore her, and get her what I think she might eat, but she was so confident in her choice that I ordered the green bean chicken for us to share. I’m so glad I did!  I don’t know who enjoyed the dish more, me or Page.  The beans were crisp and fresh, and Page devoured almost all of them!  The moment I tasted this dish, I knew that I had to try to recreate it at home.

Pin It!

Prep time: 10 minutes

Cook time: 15 minutes

Ingredients:

1 pound of fresh  organic green beans, ends trimmed

1 tablespoon of garlic paste

1 teaspoon of ginger paste

2 tablespoons of soy sauce

3 tablespoons of rice vinegar

1 chicken breast. cubed

sea salt to taste

Directions: Heat the oil, garlic and ginger paste in a saute pan just until the garlic and ginger become fragrant (about 30 seconds).

image

Season the chicken with sea salt and add it to the hot pan.  Toss well, and allow the chicken to cook through about (5-7 minutes).

image

Once chicken has cooked through, add in the soy sauce, rice vinegar and green beans.

image

Cook for an additional 5-7 minutes–the green beans should still be crisp, remove from heat, serve and enjoy!

image

Five DIY Food Gifts For Under $5

Gourmet Popcorn -- Homemade gift giving

‘Tis the season for giving! I am one of those people who loves to give.  It makes my heart happy to give.  One of my favorite gifts to give as well as receive is food.  Unlike most gifts food is useful, so you don’t have to worry that your money will be wasted on a gift that will not get used.  If you make these you can avoid the chaos that is the mall, and spend a lovely stress free 20-30 minutes in an uncrowded grocery store.  Did I mention that you could skip going to the mall? Best of all, these gifts are delicious, but inexpensive, at about $5 per person or family they won’t break the bank.

Pin It!

Caramel Popcorn with Almonds and Coconut Flakes

This popcorn is AMAZING!!! Every time that I make it, the people lucky enough to taste receive it, tell me that I should quit my day job, and package this for mass production asap!  They’re probably right too.  But I just could never do it.  Lucky for you;-)

Caramel Popcorn

Coconut Kettle corn

This stuff is like inhaling air, it’s light, salty, and sweet in all the right places!

Coconut Kettle Popcorn

Citrus powder

This can be sprinkled on fish, chicken, steak, veggies and rice, it will be the gift that keeps on giving months down the line.

image

Sour salts

Sour salts are in the pantries of some of the best chef’s in the world, why not add one to your favorite chefs arsenal?

image

Marshmallows

‘Tis the season for gifts and marshmallows.  These are way better than the high fructose laden, store bought version.  They’re made with maple syrup, and lots of love!

98244-image

Preserved Lemon Salt–How to make Sour Salts

Preserved Lemon Sour Salt

Preserved Lemon Sour Salt

This blog has been a year in the making. Sour salts and the use of sour salts first caught my attention after reading an article in Bon Appetite Magazine about  how the chef at State Bird Provisions was using sour salts to brighten up dishes, and make use of an ingredients that would otherwise not get used.  His approach was simple, dehydrate something as simple as a preserved lemon, grind it into a powder, and boom you’ve created a flavorful salt without even trying.  After reading that article, I knew that I wanted to try making a preserved lemon salt.  I put it on my list of things to blog about, but never got around to it–it has been almost a year since I read that article! Of all the sour salts I have on my list to make, the preserved lemon sour salt has always intrigued me the most–that and a lime pickle salt–I love a good lime pickle! My first thought was to make my own preserved lemons and lime pickle.  But rather than make you all–and myself wait for me to make a preserved lemon, which would further prolong me making this sour salt, I thought  I’d just skip ahead a few steps and buy some preserved lemon’s from my local Whole Foods. Christmas is just a few weeks away, and since I’m giving these salts away as gifts I cant wait to make preserved lemons from scratch.

Pin It!

Makes about 4 ounces of sour salt.

Prep time: 5 minutes

Drying time: 2hrs

Ingredients:

4 preserved lemons (sliced thinly)

Directions: Pre-heat oven to 150F if using an oven.  If using a dehydrator set it to 135F. Place preserved lemon slices evenly onto your dehydrator sheets, if using a stove,  spread over a wire rack set inside of a bake sheet.

image

Bake or dehydrate  until hard and brittle, it took about 1.5 hours in my dehydrator. Once slices are hard and crisp, transfer to a spice mill/ blender and grind until powdery,

image

Transfer the powder to an air tight container.

image

You’ve just created a gourmet salt.  You can sprinkle this on chicken, and fish.  Add it to my North African Lamb Stew, or to some grilled lamb chops, the possibilities are endless.

image

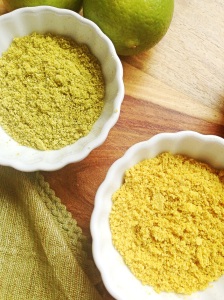
Citrus Powder–How to make Citrus Powder

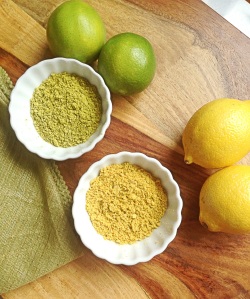
Lemon and Lime Citrus Powder

Lemon and Lime Citrus Powder


Several  month’s ago I read an article in Bon Appetite Magazine about  how the chef at State Bird Provisions was using sour salts to brighten up dishes, and make use of an ingredients that would otherwise not get used.  His approach was simple, dehydrate something as simple as a preserved lemon, grind it into a powder, and boom you’ve created a flavorful salt without even trying.  After reading that article, I knew that I wanted to try making a preserved lemon salt.  I put it on my list of things to blog about, but never got around to it–it has been almost a year since I read that article!  I had almost forgotten about wanting to do a preserved lemon salt until last week, my husband and I went out to eat.  I ordered a Caesar salad, and when they brought it out, it looked completely under dressed, almost like they had forgotten to put the salad dressing on it.  I took a bite thinking it was going to be a bland salad, but instead  got this bright  burst of flavor.  The chef had dusted the salad with lemon zest.  The salad was fantastic! Even better than my Caesar Salad.  I  knew then that I had to try this at home.   It wasn’t until I read a review for the soon to be released cookbook Bar Tartine: Techniques and Recipes that I got the idea about exactly how I could do it, but even better.  Lemon zest is great but it’s not exactly shelf stable.  If you’re going to use it, you definitely have to use it right away.  But if you take the peels of a lemon, lime, or even an orange, dry them in the dehydrator, and then blend them into a powder, what you get is something extremely flavorful, and shelf stable.  You also have a way to use leftover peels! I don’t know about you, but I hate to waste, so anything that allows me to preserve, rather than waste, I love.   So you’re probably wondering, besides a salad, what you use these powders on.  The answer is almost anything!  You can sprinkle the lemon, or lime powder on chicken, fish, pork or steak to give it a fresh and vibrant twist.  You can add these citrus powders to baked goods, rim your tequila glasses with them, add them with some other dry spices to make a citrus rub, (stay tuned for that post), make citrus salts, the list goes on and on.  If you make enough of these powders, you can even give them as gifts for Christmas.  I for one am doing a lemon pepper for my friends.   Bar Tartine: Techniques and Recipes hasn’t been release yet, but I’ve already pre-ordered a copy through Amazon.  It’s full of recipes for dehydrating and powdering everything from herbs, to yogurt.   Yes you can even dehydrate yogurt! I suppose it’s not such a leap to know that you can dry yogurt, especially given the fact that powdered milk and cheese are products that you can buy in most grocery stores. However, the thought of being able to use my dehydrator to make my own powdered yogurt and herbs excites me!

Pin It!

Pin It!


Prep time: 10 minutes

Drying time: 1.5 hours-2 hours

Ingredients:

The peels from 2 lbs of organic citrus –I used lemon, lime

Directions: Pre-heat oven to 150F if using an oven.  If using a dehydrator set it to 135F.  Using a vegetable peeler peel the skin off of the citrus.

image

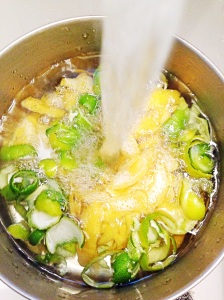
Add the citrus to a pot, add enough  cold water to cover all of the citrus and bring to a boil—let boil for 1 minute.  Drain peels into a sieve and rinse under cold water.  Return back to the pot and repeat: boil ,drain, and rinse twice more.
image

Spread the peels out evenly onto your dehydrator sheets. If using a stove,  spread the peels over a wire rack set inside of a bake sheet.

image

Bake or dehydrate  until peels are hard and brittle, it took about 1.5 hours in my dehydrator. Once peels are hard and crisp, transfer to a spice mill

image

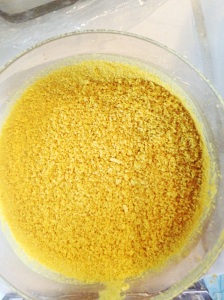
Grind until powdery, transfer the powder to an air tight container.
image

OMG! The smell of these powders while  you are grinding –AMAZING!!!! If you like this recipe you will love my  recipe for DIY Ground Ginger–How to make Powdered Ginger
 

image

Chicken Enchilada’s with Salsa Verde

Chicken Enchiladas with Salsa Verde

Chicken Enchiladas with Salsa Verde


Chicken enchilada’s are so easy to make. You can throw almost anything in enchiladas and not mess them up and they’re done in less than 30 minutes. A friend gave me some homemade salsa verde, and the moment I tasted it, I knew that it would make these enchiladas sing!  For the chicken in these I just threw a chopped onion and 1 pound of chicken thighs in my pressure cooker with enough water to cover, and cooked the chicken for 20 minutes–easy peasy.  But if you have leftover chicken you can use that.

Logo Pinterest-01

Pin it!


Prep time: 10 minutes

Cook time: 15-20 minutes

Total time: 30 minutes

Ingredients:

1 lb of cooked chicken (shredded)

2 cups of cheddar cheese (grated)

2 cups of salsa verde

1/2 cup of black olives, sliced

10-12 corn tortilla’s

Directions: Pre-heat the oven to 375F. Lightly greese a 9×11 baking dish, then line the bottom of  the baking dish with corn tortillas.  Top the tortillas with the shredded chicken, top the chicken with salsa verde, top the salsa verde with cheese, and  finally add a layer of  black olives.  Cover the olives with one more layer of corn tortillas, add a  layer of salsa verde, a layer of cheese and the last of the olives. image Place in the oven for 15-20 minutes, or until the cheese has melted, remove from the oven, serve and enjoy! image

Homemade Ranch Dry seasoning

Homemade ranch dry seasoning mix

Homemade ranch dry seasoning mix

One of my favorite condiments is salad dressing. I love making my own salad dressing from scratch. Most salad dressings are filled with way too many preservatives for my taste, not to mention hidden and not so hidden calories. I love simple vinaigrettes, but every now and again, I crave a creamy salad dressing. I resort to making this recipe for ranch, or my Caesar salad dressing. Both are fantastic in their own separate ways. I’ve come up with a recipe for a dry ranch seasoning. This ranch seasoning is extremely versatile, and can be used in a host of recipes, I’ll post 2 more ways to use it in the coming week. But first let me give you the recipe for the ranch seasoning.

Pin It!

Pin It!


Ingredients:
2.5 tablespoons of dried organic parsley
1.5 teaspoons of dried organic dill weed
2 teaspoons of garlic powder
2.5 teaspoons of onion powder
2 teaspoons of dried onion flakes
1 teaspoon of sea salt
1 teaspoon of pink peppercorns ground ( you can sub black pepper)

Add the ingredients for the dry ranch mix to a mason jar, or a re-sealable bag, and mix well. 1 tablespoon of this mixture is all you need to make my low calorie Ranch yogurt dip/salad dressing.

Lime and Red Pepper Flake Chicken Wings

Lime and Red Pepper Flake Chicken Wings

Lime and Red Pepper Flake Chicken Wings

I am not a huge sports fan, and thankfully neither is my husband! I can’t sit through games. In our house politics is what has us yelling at the television and calling the players idiots. That doesn’t mean that we don’t enjoy game day foods like chicken wings. I for one am a huge fan of spicy buffalo wings, but they aren’t huge on my husbands list of favorite things to eat. So if I want them, I have have to invent ways to indulge my craving and make them palatable for him. This recipe does just that. The tang of the lime, matched with the spice of the red pepper flake, make for a tasty and satisfying wing!

Pin It!


Prep Time: 5 minute
Cook Time: 25 minutes
Total time: 30 minutes

Ingredients:
1 lb of chicken wings
1/4 of lime juice
3 cloves of garlic crushed or grated
Zest of 2 limes
1/2 teaspoon of red pepper flakes
Sea salt to taste
2 tablespoons of olive oil

Directions: Pre-heat the oven to 425F. Pat dry your wings with a paper towel, In a bowl season the chicken with sea salt, then add the lime zest, olive oil, garlic, red pepper flakes and mix well. Place the chicken on a foil lined baking sheet and place in the oven, cook for 20-25 minutes, until the chicken is crisped and cooked through. Remove from the oven, sprinkle evenly with lime juice and enjoy! My ranch dip make these even more awesome than they already are, and while you’re at it try my Ranch Potatoes!