Grilled Zucchini and Avocado with White Wine Vinaigrette

Grilled Zucchini with Avocado and White Wine Viniagrette

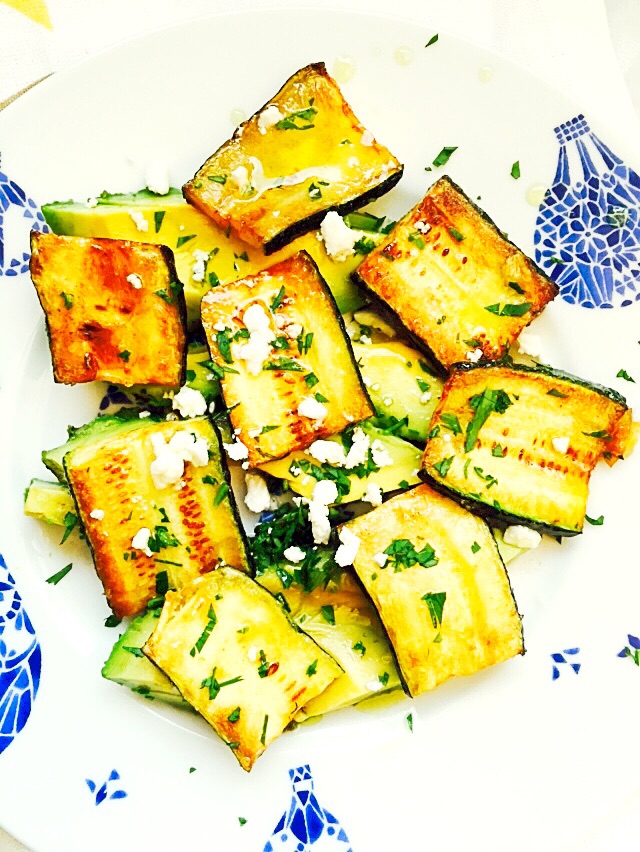
Grilled Zucchini with Avocado and White Wine Vinaigrette

T’is the season–for zucchini that is.  It is at almost every stand in my farmers market, piled into beautiful towers at my local Whole Foods, and in glistening plastic packages in my local Trader Joe’s.  There is no escaping it–not that I’d want to. Zucchini is one of those vegetables that if you plant it–you will be rewarded with an enormous bounty–so it’s no wonder that it is everywhere right now. So what do you do with an enormous bounty of zucchini?  Cook it. Pickle it. Give it away–even in secret as some of my neighbors have, by leaving an anonymous  bag full of zucchini on my doorstep.  It’s a good thing that I happen to like zucchini.  This recipe happens to be something that came about as an accident.  I was planning on making my favorite saute of zucchini and mushrooms but my plans and Page’s needs sometimes collide and I had to make an adjustment.  In this case, I had some deliciously ripe avocado’s that Page insisted that I serve her for dinner.  I had already begun to slice the zucchini so I had to cook it. So I decided why not just combine the two and make a salad of sorts. Boy, am I glad I did. I used a white wine vinaigrette, but this is great with a lemon garlic vinaigrette too!


Pin It!

Pin It!


Ingredients:

2 medium zucchini, sliced

2 large avocados, sliced

1/4 cup of feta cheese (optional)

1 tablespoon of parsley, finely chopped

2 tablespoons of olive oil or grape seed

2 tablespoons of butter or ghee

sea salt and black pepper to taste

For Vinaigrette

3 tablespoons of white wine vinegar

1 tablespoon of olive oil

sea salt to taste

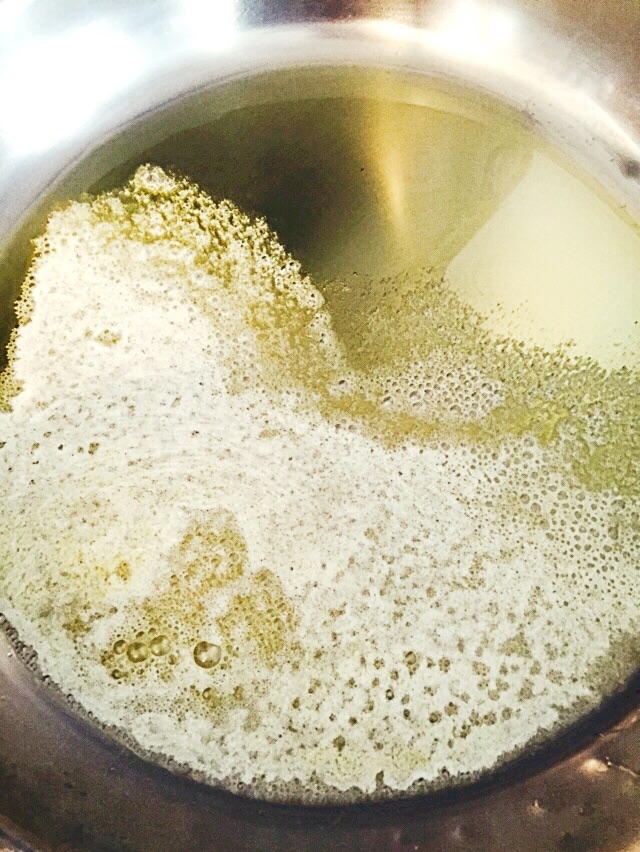
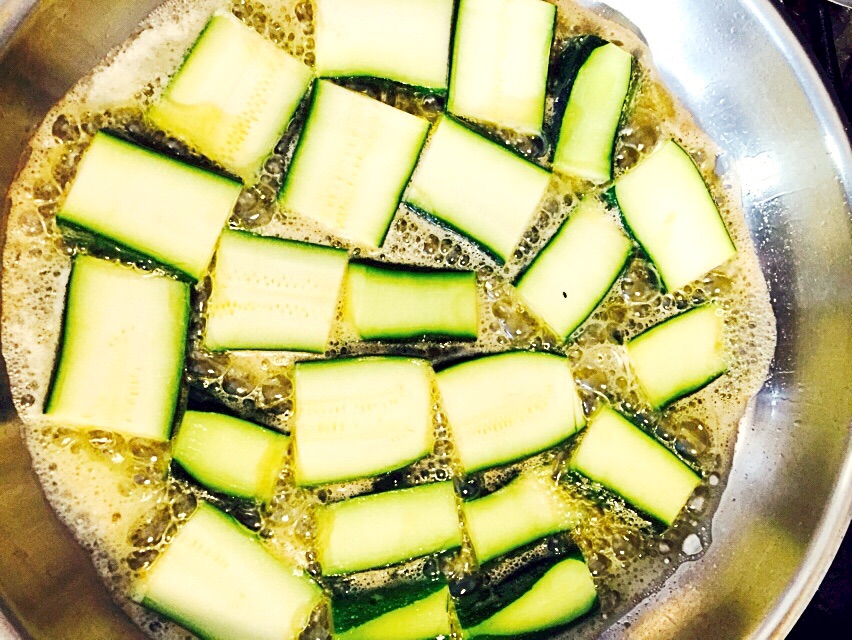
Directions: Mix the ingredients for the vinaigrette in a small bowl and set aside. Heat the oil and butter in a saute pan.

image

Once hot, add the zucchini slices to the pan and cook until brown–about 2-3 minutes on each side.

image

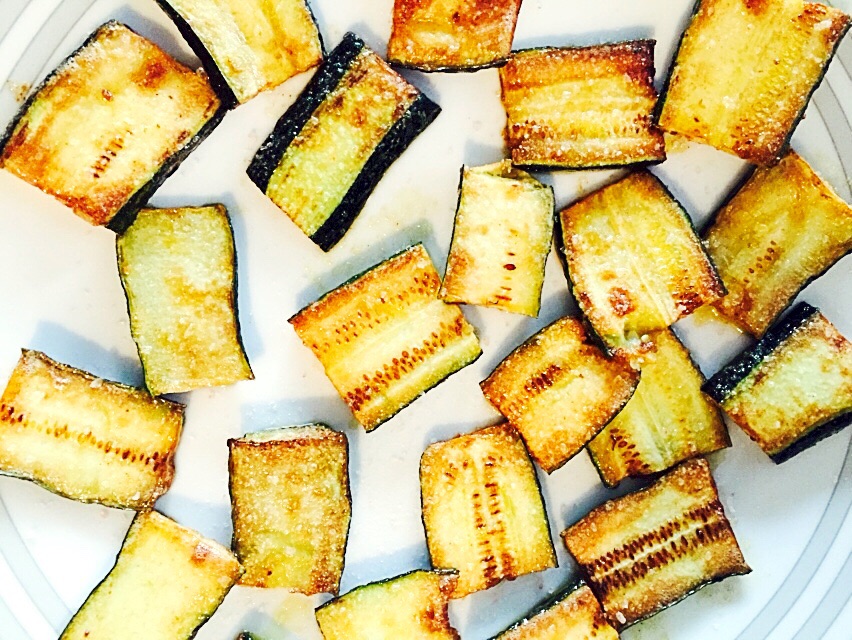
Transfer the zucchini to a plate, season with sea salt and black pepper.

image

Slice the avocado and arrange in a single layer on a plate.  Top the avocado with the grilled zucchini.  Sprinkle with feta if using, then sprinkle with parsley. Lastly top with vinaigrette, serve and enjoy!

image


Sauteed Chard with Lemon, Garlic and Shallots

Sauteed Chard with Lemon, Garlic and Shallots

Sauteed Chard with Lemon, Garlic and Shallots

Chard is an under rated vegetable.  It’s one of those vegetables that doesn’t get it’s due.  Probably because it has to contend with other vegetables that hog the spotlight, like kale, broccoli, and cauliflower.  I think that if more people knew how easy it is to cook chard, and how delicious it is, it would be a star in their dinner line up.  This recipe for chard is one of my favorite chard recipes.  It’s super easy, quick, and oh so delicious!

Pin It!

Pin It!


Ingredients

1 bushel of chard about 4 cups chopped roughly

1 medium shallot sliced thinly

4 small cloves of garlic

1 tablespoon of fresh lemon juice, more if you’re so inclined

2 tablespoons of cooking oil

sea salt to taste

Directions:  Heat the oil along with the garlic and shallots over medium heat.

image


Cook the shallots and garlic until shallots turn translucent, about 1-2 minutes.

image

Add in the chopped chard, season with sea salt and saute until wilted.

image


image


Turn the fire off and add lemon juice, toss then serve.  Yup that easy! AND So, so , so delicious!!


image


DIY Tater Tots–How to Make Homemade Tater Tots

DIY Tater Tots How to Make Homemade Tater Tots

DIY Tater Tots How to Make Homemade Tater Tots

How amazing are potatoes?  I love them in every form.  So does Page.  I have been wanting to do a tater tot for her for a long while now.  They are super easy to make, especially if you have a food processor.  You just throw the potatoes in, and the processor does all the work.  All you have to do is form the tots. If you’re not into forming a few hundred tiny balls of potatoes, this also works as a recipe for hash browns–yes a two for one! I’ve used potato starch in this recipe, but feel free to use all purpose flour if you so choose. You can also substitute almost any potato in this recipe.  Sweet potato tater tots are pretty awesome!

Pin It!

Pin It!


Ingredients:

2 pounds of potatoes peeled–I used fingerlings and purple

1 tablespoon of potato starch (can sub for any flour you’d like)

1 teaspoon of garlic powder

1/2 teaspoon of onion powder

1 teaspoon of thyme

1 tablespoon of potato starch

1 cup of high heat oil like safflower or grapeseed

sea salt to taste

Directions: Place the potatoes in a pot in cold water–enough to cover them, and bring to a boil–allow to cook for 6-7 minutes,

image

then strain and allow to cool to room temperature.

image

Once cool, grate with a box grater, or grate in a food processor.  Once grated, wrap the shredded potatoes in cheese cloth and wring out all the water that you can,  transfer to a large bowl, add seasoning, and potato starch, and form tater tots.


image

TIP: If your dough is sticky wet your fingers, balls will be easier to form. Heat oil in a skillet. Once hot fry tots in batches until brown.

image

Transfer to a paper towel lined plate, season with salt and  serve with my recipe for ketchup and enjoy!


image

DIY Concord Grape Soda–How to make Lacto-fermented Concord Grape Soda

Concord Grape Soda--Lacto Fermented Concord Grape Soda

Concord Grape Soda–Lacto Fermented Concord Grape Soda

We took a short break/vacation to take Page up north.  By north I mean northern California.  We live in southern California, and don’t really travel up north often enough, as a matter of fact, my husband would love nothing more than to move up north.  It’s where his roots are, where his soul speaks, and ultimately where I think he’d like us to retire.  Up north people are much more liberal–I would venture to say that the people up north are the prototype for what people in other states consider Californians.  Socially liberal, tree hugging, animal loving, free spirited Californians.  Here in the south, we are still liberal, but much more superficial–I call it the Hollywood effect.  People in the north are street friendly, meaning they stop and talk to you, and are truly interested in getting to know you.  They know their neighbors, talk to them regularly even.  Here in the south, you’d be lucky to see your neighbor once a week, and talk to them once a month.  It’s a very different atmosphere. Everything is so green in the north–in spite of the drought–there are so many farms–yes I said farms–I know the image of our state is one of sunshine and beaches, but we grow a lot of food here in California.  We visited the Muir Woods which Page LOVED! Page really enjoyed San Francisco, she was especially fond of the steep hills. We especially loved the food.  I had so many restaurants on my list of must try restaurants but we only made it to a few.   I really wanted to visit State Bird Provisions, and Bar Tartine,  time just didn’t permit it.  On the road trip up, I brought along my Bar Tartine Techniques & Recipes book.  I came across a recipe for Grape Soda and knew it would be the first thing that I was going to make when we returned home.  Luckily for me, concord grapes just so happen to be in season.  I found them on sale at Whole Foods for $2.99/lb.  Not bad for organic grapes!  Since my ginger bug was active, this was a breeze to make.  If you can find organic grape juice then it will be even more simple, If not take the time to juice the grapes like I did–so worth it!

Pin It!

Pin It!


Ingredients:

2 cups of organic Concord grape juice

2 cups of water–filtered

1/2 cup of strained lacto soda starter–ginger bug

2-4 tablespoons of sugar–optional


Directions: Add the juice, water and lacto starter to a large mason jar.  Make sure the jar is large enough to allow for some head space, cover with cheese cloth and place in a dark area–out of direct sun light.

image


Allow to ferment for 3-4 days or until the mixture is slightly foamy and releases bubbles when stirred.  It’s hot here so my mixture was fizzy and bubbly by day 2.

image

Transfer the mixture to a flip top bottle or canning jar, making sure to leave at least 1 inch of head space–I’d say 2.5 inches just to be safe.

image

Let this stand at room temperature for no more than 24 hours, to allow for pressure/carbonation to build,–my suggestion is that you allow this to carbonate inside of a dark cabinet.

image

You do not want to run the risk of an explosion in an open environment–it’s dangerous!  Once carbonated, transfer to a refrigerator.  Once cool, serve over ice and enjoy!  Tip:  If using a glass flip top bottle, place the bottle in a tube sock, and then place that in a closed cabinet.  If the bottle explodes it will confine the damage.


image

If you like this recipe,try my recipe for Lacto-fermented Strawberry Soda.


DIY Strawberry Soda–Lacto Fermented Strawberry Soda

DIY Strawberry Soda--Lacto Fermented Strawberry Soda

DIY Strawberry Soda–Lacto Fermented Strawberry Soda


So now that you know how to make a ginger bug, let’s put it to use.  I’ve been wanting to make this soda specifically for Page for a long while now.  The great thing about this soda is that it is full of beneficial bacteria, so it’s a soda that is actually good for you.  The directions I had for making this soda said to leave it out of direct sun light for 24 hours, so that it naturally carbonates and then move it to the refrigerator to chill and slow the process down.  I put the soda in a corner and left it to sit, about 15 hours later, I hear a loud explosion in my kitchen.  The bottle had exploded and my entire bottle of soda was lost.  There was glass everywhere! It made me so sad.  So the moral of the story is, don’t leave this out to carbonate more than 12 hours.  If you plan on doing that, then put this in a cabinet, close it so that the explosion is confined, and no one gets hurt.  Or place this in a plastic sterilized water bottle, that way you can clearly tell when the soda has carbonated, the bottle will expand and harden once the soda has been carbonated.  In the book The Art of Fermentation’ the author suggest placing a raisin in the bottle, once the raisin rises to the top that is a sign that the soda has been carbonated, and you can transfer it to the refrigerator. I juiced fresh strawberries in my juicer for this recipe.  There are many recipes out there that boil the berries with sugar to make a syrup, and then use the syrup as a base to make this soda.  I preferred to just use fresh juice–delicious!  Also the sugar is an optional ingredient, if the strawberries you’re using are already sweet then you don’t really need to add more sugar.

Pin It!

Pin It!

Ingredients:

2 cups of strawberry juice

2 cups of water

1/2 cup of ginger bug

1/4 cup -1/2 cup of organic raw sugar –optional

Equipment:

Close top bottles


Directions: Remove the stems from the strawberries–about 3 pints and juice them.

image


image

image

Strain 1/2 cup of the ginger bug.

image


To a large bowl add the strawberry juice, water, ginger bug, and sugar if using,

image


image

Stir well cover with cheesecloth and place out of direct sun light to allow the mixture to ferment over night.  If you’d like you could ferment longer–up to 3 days, but the flavor of mine was just perfect after 24 hours.  The bacteria eat the sugar, so the longer you leave it, the less sweet it becomes.  But be careful, the bacteria will convert the sugar to alcohol so you don’t want to leave it too long–unless of course you want to make this a mead–a delicious alcoholic beverage,  instead of a soda.  Transfer the mixture to an air tight bottle or mason jar to carbonate, store in a dark cabinet–or a safe area where if it explodes it will not harm you or your family members.


image


image

Store for up to 12-15 hours before moving it to the refrigerator to chill.  Once chilled open the bottle over a sink–natural carbonation is a powerful thing!  Pour over ice and enjoy!

image

image

How to Make a Ginger Bug–How to Make a Lacto-Starter

How to make a Ginger Bug--How to make a Lacto Starter

How to make a Ginger Bug–How to make a Lacto -Starter

So you’re probably wondering what a ginger bug is, and why on earth would I make it!  The short answer is that it’s a culture of good bacteria that is used as a base for homemade lacto fermented sodas.  Much like kefir, kombacha, yogurt, and  other fermented foods like pickles, kimchi, and sauerkraut, the bacteria in lacto fermented sodas provides beneficial bacteria to our guts. I’m not a fan of conventional soda’s for obvious reasons, and I’m so glad to have this as an alternative.  The recipe I used for making this lacto soda starter comes from the book Bar Tartine Techniques & Recipes, get a copy, it’s a great book.  You can use any type of sugar that you like in this recipe, and don’t worry about the sugar, it’s not for you, it’s for the bacteria, and they need it to thrive.   They eat it, and what’s left over is a thing of pure beauty.  One thing you should know about this recipe, is that you have to use organic ginger.  Commercial ginger is radiated, and because of that will not make a successful starter.

Pin It!

Ingredients

4 cups of filtered water

5 teaspoons of grated  organic ginger

5 teaspoons of organic sugar

Directions: Add the water,

image

1 teaspoon of ginger,

image

and one teaspoon of sugar, to a large canning jar, or a bowl, stir well,

image

cover with cheesecloth and place in a dark corner.

image

The next day add one teaspoon of ginger, and one teaspoon of sugar, stir well, cover with the cheesecloth and return to the corner.  Continue to do this for another 3 days.  By the 5th day your ginger bug should be bubbling with action.  By bubbling I mean this:

image

The bubbles are not boiling, just a few here and there, but when I moved it with spoon it sizzled.

image

image

image

Once you get that, your ginger bug is ready to use. If you’re not ready to use it right away, transfer it to a mason jar, cover it, and refrigerate it.  Make sure to feed it once a week with 1 teaspoon of ginger and 1 teaspoon of sugar.  When you’re ready to make soda bring the starter to room temp, feed it with 1 teaspoon of ginger and 1 teaspoon of sugar until it bubbles again, about 3 days.  Stay tuned tomorrow I’ll share my recipe for strawberry soda using this starter–it’s soooooooooooooooo good!

image

Miso Buttered Salmon

Miso Buttered Salmon

Miso Buttered Salmon


So now that you know how to make miso butter,  what do you do with it?  The truth is, there are a myriad of things that you could use miso butter on, one of my favorites is on veggies.  Especially corn.  Page loves corn, and I buy organic non gmo corn at the farmers market whenever it’s in season.  I shave it and freeze it.  Then I throw it in a pot with no water and allow the water to cook off, once it has I add in miso butter, and let the butter  brown.  The kernels get the nutty flavor from the brown butter, with an unami flavor from the miso–talk about delicious!!  Besides corn, I love it on green beans, sauteed spinach, asparagus, brussel sprouts, cabbage–just about any veggie you can think of, miso butter makes it better.   Do you know what else miso butter makes better?  Meat! Almost every kind of meat.  Steak with miso butter is a revelation! Seafood with miso butter is ascension!   This recipe is so delicious, I find it hard to eat salmon any other way.  Every bite of this deserves it’s own moment of silence, it’s own moment of indulgence.

Pin It!

Pin It!


Prep time: 5 minutes

Cook time: 10-12 minutes

Ingredients:

1 lb salmon steak, patted dry

2-3 Tablespoons of miso butter

1/2 teaspoon of garlic salt more if you desire

Directions: Pre-heat oven to 425F.  Season salmon steak with garlic salt.

image

Using a butter knife apply a thin layer of miso butter on the top and sides of the salmon.

image

Place the salmon on a foil lined baking sheet, then place in the oven for 10-12 minutes, or until salmon is cooked through.  In my experience 10 minutes is usually the perfect time, you only want to go longer if you salmon steak is thicker than 1 inch.  Longer than 15 minutes and your salmon is probably over cooked.

image

Remove the salmon from the oven.  It should be nice and caramelized on top.  Serve and enjoy!


image

image


Miso Butter–How to Make Miso Butter

How to Make Miso Butter

How to Make Miso Butter

Butter is delicious all on its own, I love adding it to sauces, slathering it on piping hot corn on the cob, or a simple piece of toast. There is not much that butter doesn’t improve.  However, miso butter is the younger, prettier, and more sophisticated sibling of butter. It’s everything butter is, but better! I was introduced to miso butter by David Chang after watching a chef series he did.  Frankly, I don’t know why I never tried making miso butter before.  I have had it several times at restaurants, and was always fascinated whenever chefs mentioned using it. I guess it just never occurred to me to try to make it at home–until it did–and now I can’t live without it.  Most chefs recommend using a 2 to 1, or 3 to 1 ratio of butter to miso.  I found my sweet spot is larger on the butter side, so my ratio is more of a 4 to 1. Tomorrow I am going to share one of my absolute favorite ways to use miso butter, until then here is how you make it.

Pin It!

Pin It!


Prep time: 5 minutes


Ingredients:

2 tablespoons of white organic miso

7  tablespoons of grass fed butter–cut into cubes–it makes mixing easier

Directions: To a medium size bowl add the butter,

image

Then the miso.

image

Using  the back of a large spoon, mix and mash together the butter and miso paste until well combined.

image


image

You’ll know the butter is fully mixed when you no longer see streaks of brown or yellow.

image

Once the butter and miso have been well combined, transfer to an air tight container and refrigerate for later use.

image

image

This butter is amazing on almost everything, from steaks to veggies and fish!  See you tomorrow;-)

If you like this recipe try my recipe for How to make Butter or How to brown butter


DIY Onion Soup Mix–Copy Cat Lipton’s Onion Soup Mix


DIY Onion soup mix

DIY Onion soup mix

There are three seasonings that I can rely on my mom to have in her cupboards at all times: Lawry’s seasoning salt, Lemon pepper, and Lipton’s Onion Soup Mix.  In fact while writing this, I was tempted to call her, and have her take a picture of what is inside her cupboards, just so that you guys could see, but she’s not that technologically savvy.  She barely knows how to get the pictures that I send her of Page through text.  When I was growing up my mom would rent  4-5  movies and make a bunch of snacks for us watch over the course of the weekend.  One of those snacks was a sour cream and onion dip.  She’d take a container of sour cream and mix in a package of the Lipton Onion Soup mix–simple but delicious.  We’d happily nosh on potato chips, celery, and carrot sticks dipped in the onion dip while we watched the latest movie release from Blockbuster video–yes I just dated myself!  Oh the memories!  I haven’t had that dip in years!  I’d say a good 10-12 years, maybe longer.  It’s not something my mom makes any more.  I wanted to make it for me and my hubby, but I didn’t want to buy the Lipton’s seasoning. I had an idea of what was in the seasoning–or at least I thought I did– dried minced onion, onion powder, dried green onion–but to be sure I called my mom and asked her what was on the ingredient list.  Sure enough she had a box in her cupboard and  the ingredient list she read to me was anything but simple. Besides the MSG, onion powder, and cornstarch, there were a list of ingredients that had  nothing to do with onions. So I set out to do what I do best and made my own–without all the added preservatives and coloring.  I used the organic onion powder that I made myself, and added minced onion and a few herbs.  A perfect match! Tastes just like I remember it! Delicious!!

Pin It!

Pin It!


Makes the equivalent of 1 package of Lipton Onion soup mix

Ingredients:

4 Tablespoons of organic dried minced onion flakes

3 teaspoons of organic onion powder

1 teaspoon of organic dried chives

1 teaspoon of sea salt

1/4 teaspoon of celery salt

Directions: Mix all ingredients together in a small bowl, if you don’t plan on using this right away, transfer it to an air tight container for later use.

image


image


image


Mango Creamcicles

Mango Creamsicles--Mango Half and Half Bars

Mango Creamsicles–Mango Half and Half Bars

Yesterday marked the official kick off of the summer season, and nothing screams summer more than a creamsicle! They’re the perfect blend between a popsicle and ice cream–half popsicle and half ice cream–doesn’t get much better then that!  If you don’t have a Zoku Quick Pop Maker–order one! It will more than pay for itself.  If you just refuse to spend the extra $10-12 to upgrade from your popsicle molds, then go ahead and use your popsicle molds, but you will not get the creamy center  you get from a typical half and half bar.

Pin It!

Pin It!

Ingredients:

1/2 cup of mango puree

1/4 cup of water

1 cup of organic coconut cream can sub with heavy cream or half and half

1 teaspoon a vanilla extract

2 tablespoons  of maple syrup or sweetener of your choice

Directions: To a cup add the cream vanilla extract, maple sugar, mix well and set aside.  To another cup add the mango puree and water, and mix until mango puree is thinned out.

image

If using classic pop molds, place all ingredients in a blender and blend until well combined.  Divide mixture evenly among molds and freeze for 6-8 hours or until frozen solid.

If you are using the Quick pop maker, Pour the mango juice into the molds and allow to set for 2-3 minutes.
image
At the 3 minute mark siphon out the remaining unfrozen juice with a straw or a unused infant aspirator–I purchased one just for this.  Zoku sells a tool kit for $20 which includes a siphon tool, but the aspirator is $3 and does the job equally as well.
image
 After you have removed all of the juice, pour cream into the molds, and allow to set for another 4-5 minutes, then follow the directions for removing the pops.
image
image
image