Amara’s Indian Fish Fry

Amara’s Fish fry

I’ve had many Indian style fish fry’s in my life, but this particular one carries special meaning for me, because it is a recipe that was taught to me by my mother-in-law. Like many mother-in-law and daughter-in-law relationships ours didn’t begin easy. But our relationship turned into a relationship filled with deep love, admiration, and mutual respect. Our relationship was hard in the beginning because my mother-in-law had such a deep love for her son. It was hard for her to take a second seat to me, but the truth is she didn’t have to, my husbands heart is, and was, big enough for both of us to be in it. You could see the mutual love they had for each other upon every meeting. Every time my husband entered his moms presence, she would beam with joy! The whole room would light up from her smile when she saw him. I’ve never met a man who was as close to his mother as my husband was to his mom. He’s a better man, a better husband, and a better father because of that love. I will always be thankful to her for that. One of the things I loved doing most with my mother-in-law was cooking. We didn’t cook together that often, because she wanted to cook for me and my husband not with us. She especially loved cooking for my husband, and he loved eating her food. He would often call me to come over and have dinner with them, while we were dating, and when I arrived there would be this massive meal just for the 3 of us. This recipe is simple in every way, but it’s delicious, and more importantly dear to my heart.

Prep Time: 5 minutes
Cook Time: 10 minutes
Total Time: 15 minutes
Servings: 2

Ingredients:
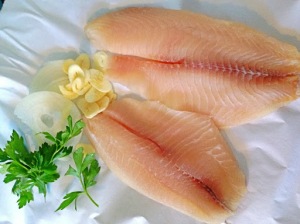
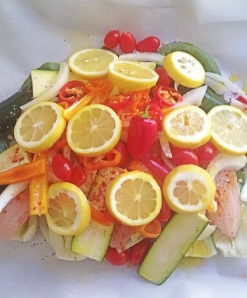
1 lb of white cod, cut and cubed
2-3 teaspoons of ground turmeric
3 tablespoons of safflower oil for frying
Sea salt to taste
1 tablespoon of chopped cilantro
4-6 Lemon wedges

Directions:
Heat the oil in a cast iron pan. Season the cod with sea salt, then lightly dust all sides of the cod with the turmeric, and place into the hot oil.

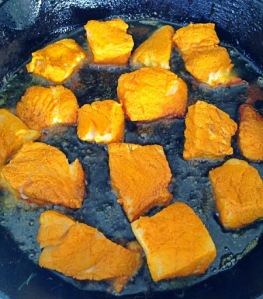
Cook for 3-4 minutes on both sides, remove from oil, and serve with lemon wedges and cilantro, enjoy!

Ground chicken Larb–the ultimate lettuce cups

One of my favorite Thai meals, besides Crab fried rice, is Larb! It’s light, refreshing, and so flavorful. It literally makes my taste buds do a happy dance with every bite. This recipe is a great way to use any ground meat that you have, but it works especially well, with chicken and pork. If you have never tried Larb before, then your taste buds are in for a real treat!

Prep time: 5 minutes
Cook time: 10 minutes
Total time: 15 minutes

Servings 8-10 lettuce cups

Ingredients
1lb of ground chicken
1/2 cup of green onion chopped
1 clove of garlic chopped
1/2-3/4 cup of fresh mint leaves
1/3 cup of chopped red onions
1/4 cup of chopped cilantro
Sea salt to taste
1 cup of shredded cabbage
1/2-1 teaspoon of chili pepper flakes or more if you like
1 head of romaine lettuce, or butter lettuce, leaves removed and cleaned to use as cups

Larb Dressing:
4 Tablespoons of fish sauce( available at any store in the ethnic food isle)
1/3 cup of fresh lime juice
2 cloves of garlic chopped

Directions:
In a small bowl add the ingredients for the dressing, mix well and set aside.
Season and brown the ground chicken with the red onions and garlic. Once the meat is browned pour out any excess liquid, then add in the green onions, half of the mint, chili pepper flakes, and the dressing. Cook for 1-2 minutes then turn off the heat.

Spoon the meat mixture into the lettuce cups, top with remaining fresh mint, shredded cabbage, cilantro leaves and enjoy!

Crab Taco’s with yogurt lime cilantro sauce

How lovely would it be to come home and have a dinner that you don’t have to cook? Well my friends this is your lucky day! This a recipe that doesn’t involve any cooking. It has been so hot here that the last thing I want to do is to turn on my stove to cook. So this week when I went shopping I concocted a meal plan that would allow me to do as little cooking as possible. My meal plan thus far has been quite genius not to mention delicious! I can’t wait to share some of the recipes with you, but first these no cook taco’s.

Prep Time: 15 minutes
Cook Time: 0 minutes
Total Time: 15 minutes

Ingredients Taco filling
10 ounces of fresh lump crab meat steamed
1/2 teaspoon of cumin
1-2 teaspoons of Lime juice
Sea salt to taste
1/2 cup of Shredded carrots
1/2 cup of shredded cabbage
1/2 cup of diced tomatoes
1/3 cup of chopped fresh cilantro

Ingredients for lime cilantro yogurt sauce
1 cup of Greek yogurt
Juice of half a lime
1 clove of garlic chopped
Sea salt to taste
2 tablespoons of chopped cilantro

Ingredients for pickled red onion
1 red onion sliced thinly
1/2 cup of apple cider vinegar
1 cup of water
1 tablespoon of sugar
1.5 teaspoons of kosher salt

Directions yogurt sauce:
In a small bowl add all the ingredients for the yogurt sauce, mix well and set aside.

Directions for pickled onion:
In a medium bowl whisk the salt and sugar into 1 cup of water, until the salt and sugar dissolves, add in the vinegar and onions and let sit at room temperature for at least 1 hour. Hint you can do this the night before you need to use the onions.

Directions for Taco:
In a medium bowl, mix the cumin and lime juice with the crab meat. Warm corn tortillas and add the crab, top with cabbage, tomato, carrot, pickled onion, cilantro, and some of the yogurt lime cilantro sauce, and enjoy!  How easy was that?

What is your favorite no cook meal?

Follow me on Facebook: http://www.facebook.com/lazygirldinners

Nut and fruit snack bars


I love Kind bars, but they can get a bit pricey at almost $2 a pop. I know how easy these type of bars can be to make, so I decided to make my own. The only real work involved is mixing the ingredients. The great thing about these is that you can use your favorite nuts and dried fruits. I happened to have some Hawali dates that I got from the farmers market, so I added those, and some raisins. You can add whatever you have, and make these your own. These are a great snack, I usually have one for breakfast, or a afternoon snack. You can’t really go wrong with these since they are pure protein and fiber.

Pin It!

Pin It!


Prep time: 5 minutes
Cook time: 10 minutes
Total time: 15 minutes

Ingredients:
1 cup of Organic almonds chopped
1/2 cup of organic sunflower seeds
8-10 dates chopped
3 tablespoons of organic raisins chopped
3 tablespoons of unsweetened coconut flakes
1/3 cup of brown rice syrup, or honey

Directions:
Add all ingredients to a medium size bowl and mix well:

Spread mixture out evenly onto a lightly greased foil lined 9 inch pan:

Bake on 325F for 10 minutes. Remove from oven and let sit for 10 minutes, just long enough for it to cool, but not completely cool. After ten minutes, cut into bars, and let cool completely before eating. If you use honey after cooling place in the refrigerator, so that the bars set completely. If you like these you will probably like these Granola bars

Parchment paper meals

These last two weeks have been unbelievably busy for us. I’ve barely had time to think, let along blog and cook. In addition to that it has been extremely hot here, too hot to cook. Turning on my oven when my house is already 100 degrees in the shade is not my idea of fun. Luckily I have a countertop convection oven. I use it all the time, especially for hot days and quick meals like this one. Our staff Nutritionist Justice De La Torre is the queen of these Parchment paper meals. She sent me over a picture of one of her meals and so I had to try it out for myself. You can put any type of fish in this that you’d like! I have done this with fresh sardines, salmon, and tilapia with great success! You literally put every thing in, fold the parchment and bake for 10-12 minutes and dinner is done. This is perfect for a quick cook meal on a hot day.

Prep Time: 5 minutes
Cook Time :10minutes
Total time: 15 minutes

Ingredients:
2 tilapia fillets
1-2 tablespoons of Olive oil
3-4 Onion rings per piece of fish
2-3 slices of Bell pepper per piece of fish
3 cloves of garlic sliced
Lemon or lime slices

Directions:
Place the fish on top of parchment paper, drizzle with oil and season with sea salt.

Top with onion, garlic, bell pepper and lemon or lime slices. Fold the parchment into an envelope, Bake on 425 F for 10-12 minutes.

 Serve with a nice green salad, or throw some squash in like Justice did and you have a complete meal.

What do you make for dinner when it’s too hot to cook?

Like me on Facebook: http://www.facebook.com/lazygirldinners

Graham Crackers

Cinnamon Graham Crackers

Going into the store now a days is quite a test of wills between me and my daughter. She is always asking to have the box of cookies/crackers/treats with the picture of Elmo on it.  I find myself trying to avoid that aisle all together, but the marketers have this kind of stuff all figured out–smart bastards– they put those products on the same aisle as the children’s vitamins and hygene products, so it’s almost unavoidable! Luckily for now my daughter has a short attention span, so I find that if I just let her play with the box while we are in the store, and give her an apple just before we leave the store, I can get out of the store without buying the box of treats, which she probably won’t eat anyway. It’s tough but us moms have skills too you smart alec marketers! Have you ever read the ingredients on some of these snacks? If you have then you probably know that they’re full of things that are hard to spell, and that probably aren’t good for you.  I wanted to buy my daughter some healthy graham crackers to go along with some marshmallows that I made. But I read the ingredients on a box at the store, and not one of the boxes contained actual graham flour. Weird, considering the crackers are named for the use of that very flour.  So I bought some graham flour, and set out to make my own.  You can find graham flour at Whole foods, or on Amazon. It’s pretty inexpensive, about $3 for enough flour to make at least 10 batches of these crackers. If you consider that 1 box of graham crackers is $4 then you know you’re saving! You can play around with the use of the second flour in this recipe, as I did.  I made these with all purpose, coconut, and spelt flour.  I can tell you that the difference in taste is hard to decipher.  The coconut flour definitely took some fidgeting with, because it absorbs so much liquid, so I had to add much more water to that batch. But whatever flour you decide to use, just know that the final product will still be delicious.

Makes 75-100 mini crackers and 24 large crackers
Time: 25 minutes

Ingredients:
3/4 cup of graham flour
1/4 cup plus 2 tablespoons of spelt or all purpose flour
1/4 cup of coconut sugar, or maple sugar, or organic cane sugar
1/2 teaspoon of baking powder
1/2 teaspoon of baking soda
1/4 teaspoon of sea salt
1/2 teaspoon of ground cinnamon
4 tablespoons of  chilled butter, cut and cubed
3 tablespoons of water
1 tablespoon of molasses
1/2 teaspoon of vanilla extract
Directions:
Preheat oven to 375 degrees. Place all of the dry ingredients into your food processor and pulse to combine. Add in the butter and pulse until mixture resembles corse corn meal.

Add in the wet ingredients and process until dough becomes a ball.

Roll dough out between to pieces of parchment paper until dough is about 1/8 inch thick.

Remove top layer of parchment and cut out shapes or use a pastry flute or knife to cut out 2.5 inch squares.

Remove any excess dough and set aside so that you can roll it again. Place the parchment paper with the cut out crackers onto a cookie sheet, and bake for 15 minutes, turning them mid way, bake until they are golden brown and the edges are firm. Be careful to check on these often they burn easily. Repeat this process with any remaining dough. Let the crackers cool on a cookie rack, and then enjoy!

Okay give me your best grocery shopping with little ones tips, I really need them!!

Follow and like me on Facebook : http://www.facebook.com/lazygirldinners

Homemade Marshmallows

Home made Marshmallows

Becoming a parent has afforded me the benefit of seeing the world anew.  I love watching my daughter get such pleasure from the smallest of things. Interacting with her reminds me of all the fun I had as a kid, and all the things that brought me pleasure; like having cookouts, going to the beach with my family, eating ice cream, candy, s’mores and toasted marshmallows. I want her to have all of those same pleasures, but without all the additives, and sugar. This is every moms wish I suppose. Some of us just give in and buy the box of cookies, and others like myself let the guilt eat us and try to offer our children other alternatives. Last week I was feeling very nostalgic and I wanted to let my daughter have a s’more. I could have bought store bought marshmallows, and graham crackers, but both are super easy to make, at home. So I decided to give them both a go, (recipe for the graham crackers coming soon).  This recipe for marshmallows is actually pretty good for you.  I used an organic grass-fed gelatin, which is composed of the amino acids, glycine and proline. These amino acids are great for over all immune health, and they are required for proper skin, hair, and nail growth. They also aid in digestion. These marshmallows contain no refined sugar. I used maple sugar, but you could use, agave, honey, coconut sugar, all are great options. Even if you use white table sugar, these will still be preservative free and very, very good! If you are like me and love marshmallow fluff, then dig into the finished product right away! It’s super gooey and delicious! If messy isn’t your thing, then wait and let them set.

Makes
45 marshmallows
Time:
25-30 minutes

Ingredients:
1 and 1/4 Tablespoons of unflavored grass-fed gelatin
1 cup of maple sugar
1/2 cup of cold  water divided
1 Teaspoon of vanilla extract
1/8 teaspoon of sea salt

Equipment
A stand mixer or hand mixer

Directions:
Line a 13 by 9 inch baking pan with foil:

Pour 1/4 cup of the water into mixer bowl, sprinkle the gelatin over the water and let sit until gelatin becomes very firm about 15 minutes:

Meanwhile,  add sugar, the remaining water and salt to a pot over medium heat. Bring to a boil and cook gently swirling the pan until the sugar has dissolved completely and the temperature reaches 240 degrees, about 6-8 minutes:

Turn the mixer on low  and slowly add the hot sugar mixture to the gelatin:

Once the sugar mixture is added, turn the mixer on high. Beat until firm peaks form, and the mixture is very thick about 10-12 minutes:

Pour out into a foil lined pan. Smooth out, and enjoy immediately, or cover and allow to set at room temperature over night.

When you are ready, you can cut out cute shapes like I did, or just squares.  I lightly dusted a cutting board with some cornstarch, and turned the marshmallow slab out onto the cutting board.  Then I spayed my cookie cutters with coconut oil, and made these lovely shapes:

These go great with graham crackers and chocolate, or in my recipe for Banana Marshmallow Split!

Do tell, what are some of your favorite childhood treats? Do you still eat them?

How to roast chicken-Steps to making the perfect roast chicken everytime!

Lemon and Garlic Roast Chicken
Pin It!

Pin It!


Roasted chicken is universal. Almost every culture has some version of roasted chicken in their culinary history. However, as universal as roast chicken is, many still have a hard time making it. Just yesterday someone I follow posted a before and after picture of a roast chicken on Instagram. The bird was pasty before it went in the oven, and the bird was still pasty after it came out of the oven. I felt bad for this Instagramer because I’ve been there. The truth is that roasting a bird perfectly begins with steps that are made long before the bird goes in the oven. If you master these steps, I guarantee you that your roast chickens will come out of the oven, perfectly marinated, juicy and with a skin that is crackling and golden brown.

Step 1. Pick the right chicken! Organic, non GMO, and air chilled is the way to go! Why? Because conventional chickens are stored in salt water to plump them up before you buy them. A water logged chicken can taste good, but it will likely be harder to get a crispy crust on a water logged chicken, than one that is not water logged. Note: Read the label on the chicken, most chickens in the supermarket have  up to 4% retained water because they are dropped in a 34 degree chlorinated water bath before they are sold. Air chilled chickens are not exposed to water, so getting a crisp skin on an air chilled chicken is easier.

Step 2.  Brining! Most of you are probably thinking, “but you just said not to buy a water logged chicken, now you’re telling me to brine it?!” I said it, and I meant it!  There are other ways to brine without water.
Salt brining. This will change your life! Salt brining literally is what it sounds like, you thoroughly salt the chicken, put it in a Zip-Loc and let it sit over night. Salt does two things, it retains moisture and it pulls out moisture. This is a wonderful thing for a small bird like a chicken, because it doesn’t take longer than an hour to cook, so the amount of moisture it looses because of the salt brine is not significant enough for it to dry out. But it pulls out just enough moisture on the surface of the bird to make the skin crisp. At the same time it breaks down the protein, which means moist, tender, and well seasoned chicken!

Step 3. The skin needs to be rubbed with oil, not butter. Although butter tastes great, it contains 16-18% water and 80% fat. Water is an enemy to getting perfectly crispy skin on a roast chicken. If you want to use butter to flavor your chicken, then by all means do so. Just make sure to put the butter where it will do the most good..under the skin in the breast bone. If you want crisp brown skin, use oil, it does not contain water, it is 100% fat, so it will result in a chicken that is so beautifully brown, you may not want to cut it…note I said may not, after you get a whiff of the this delicious chicken all bets are off.

Step 4. Bake on a high temperature from the start. Most people reverse bake roast chickens, meaning they bake at a lower temperature for a longer period of time so the chicken doesn’t dry out, and then blast it at the end on a higher temp in hopes of browning the skin.  Seems plausible enough but results are often not consistent. Take my advice, bake your chicken on 450 degrees farenheight for 45 minutes to 1 hour, your chicken will come out perfect every time.

Recipe for brine
1.5 tablespoons of Sea salt or kosher salt for every 1 pound bird.

Sprinkle the salt all over the bird, place in a large bag and let sit over night. When your ready to cook it, add the oil and any herb you want–rub with a little garlic, bake it for 45 minutes to one hour, and Wah-La perfectly roasted chicken!

Roasted Chicken with Lemon and Garlic

Lemon and Garlic Roast Chicken

I love to roast chicken whole.  It is the epitomy of lazy cooking in my opinion, however, the payoff is amazing! You marinate the chicken, stick it in the oven for an hour, and you’re done.  I’ve mastered the art of roast chicken.  My roast chicken is famous among my friends and family. Brining is the secret to perfectly roasted chicken, but I’ll save that for a another post.  For now I’ll just give you a recipe for perfectly roasted chicken.

Here’s what you need:
Ingredients
1 Whole Organic non-GMO Chicken
4 cloves of garlic, pasted
The juice of 1 lemon
The zest of 1 lemon
Sea salt
Black pepper
2 Tablespoons of olive oil

Servings: 4-6

Directions:
In a small bowl add the pasted garlic, lemon zest and oil.

 Rub the the olive oil  mixture all over the Chicken, and season it generously with sea salt and pepper.

Place the chicken in a 450F degree oven and bake for 45 minutes to an hour. Remove once the chicken has cooked through and the skin is crispy and golden brown. Pour the the lemon juice over the chicken, let rest for 10 minutes and serve.

Do you have any tips for roasting chicken? 
Follow and Like me on Facebook: http://www.facebook.com/lazygirldinners

Banana Marshmallow Split!

Banana Marshmallow Split

I wasn’t going to post this on the blog, just because this is so easy to make, it barely needs directions. I made this dessert after making a fresh batch of marshmallows, I’ll post the recipe for those soon. This is a super yummy single serve dessert that isn’t involved at all. But it’s so yummy that you’ll probably want to make it all the time. Sometimes I add peanut butter to this, or almond butter and sliced almonds. You can even add sliced strawberries if you want to make it fancy.

Ingredients:
1 Banana split down the middle
1-2 squares of a good quality chocolate (chopped into small pieces) ( I used 60% organic fair trade bittersweet chocolate)
4-6 miniature marshmallows
2-3 walnuts crushed

Equipment needed:
Foil

Serves: 1

Directions:

 Place the chocolate and marshmallows inside the slit banana:

Cover with foil. Bake in a 400F degree oven for 5 minutes:

Remove the banana peel. Place in a serving bowl, top with crushed walnuts and enjoy!

Share your favorite single serving dessert recipes? I’d love to try some new ones;-)