Marinated Mushroom Steaks

Marinated Mushroom Steaks

Marinated Mushroom Steaks


I make an entire meatless meal at least once a week.  Going vegetarian, or vegan, even once a week is great for your health, excellent for your pocket book, and a very environmentally friendly thing to do.  One of my favorite and I mean FAVORITE vegetarian meals is faux steak, with beans, rice, salsa, and plantains.  It’s simple–yes! But so delicious, and it reminds me of the delicious dinners I had while in Puerto Rico.  I switch out the steaks for marinated, grilled mushrooms, and the result is perfection!


Logo Pinterest-01

Pin it!


Prep time: 30 minutes

Cook time: 7-10 minutes


Ingredients:

2 large Portabello mushrooms, undersides and stem removed

1/2 teaspoon of worcestershire sauce (optional)

1 large garlic clove sliced thinly

1 tablespoons of olive oil

1 tablespoon of white wine vinegar

sea salt and black pepper to taste


Directions: Mix together all the ingredients for the marinade in a small bowl.  Pour over Mushrooms and let marinade for 30 minutes.


Grill on a hot grill for 3-4 minutes on each side, remove from grill and serve!

Marinated Mushroom Steaks

Marinated Mushroom Steaks

Sauteed Beet Greens with Garlic and Feta Cheese

Sautéed Beet Greens With Garlic and Feta Cheese

Sautéed Beet Greens With Garlic and Feta Cheese


I planted a garden about four months ago, the first thing to sprout from my garden were these lovely beet greens stalks. They were so beautiful and perfectly green that I found myself fighting the urge to pick them too soon.   For the longest time I had no idea that I could actually eat the tops of the beets, which means many, many, beet greens have been thrown in the trash by me without a thought. When it finally hit me that these beautiful greens were actually edible and that I could cook and eat them, I wondered why it had taken me so long to do so!  My husband is not a fan of beets at all. However, he is an ultra fan of the stalks on this vegetable.  I can’t blame him, the greens produced from the beets are delicious and tender, and when cooked, they are reminiscent of tender spinach.

Pin It!

Pin It!


Prep time: 5 minutes

Cook time: 10 minutes

Total time: 15 minutes


Ingredients:

5 cups of beet greens chopped

2 large garlic clove (sliced thinly)

1 teaspoon of balsamic vinegar

1/4 cup of crumbled feta cheese

2 tablespoons of olive oil

sea salt to taste

Directions:  Add the oil and garlic to a saute pan over medium heat.  Cook until you smell the garlic, about 20 seconds.


image

Add in the beet green and saute until they begin to wilt.

image

Add in the balsamic, and cook for another 3-4 minutes.  Transfer the greens to a bowl, top with feta cheese, and enjoy!

image

Cherry hand pies

Cherry Hand Pies

Cherry Hand Pies


I am not a fan of baking, but every now and then I get a craving and I drag myself into the kitchen and have a go at it. Baking involves a lot of science, and only after one has mastered the science, can one move onto the artistry of it. In cooking you can add a little here and there and the final result will not be drastically altered, with baking, well let’s just say, baking is much less forgiving, and that my friends is why I avoid it if I can. There is a reason why chefs on top chef avoid doing desserts–sooo many things can go wrong. This recipe took me several tries before I was happy with the final product. I tried this with puff pastry and I was less than impressed. I moved on to a gluten free, do-it-yourself pie crust, and was highly disappointed. It was my fault really, the dough was good, but I used way too much butter, and the dough spread and wouldn’t stop spreading.  Finally I gave in and bought ready made pie crusts, the kind you roll out–not the kind already in a pie tin–and I was very pleased with the result.  These little hand pies make a great addition to a picnic, they’re small, mess free, and you don’t have to worry about having a knife to cut the pie because these are single serving.

Logo Pinterest-01

Pin it!


Prep time:10 minutes

cook time: 30 minutes

Makes 6 pies

Ingredients:

2 cups of fresh cherries, halved and  puts removed

1/2 cup of maple sugar (cand use maple syrup, cane sugar, or sweetener of your choice)

1 tablespoon of lemon juice

1  teaspoon of vanilla extract

1 tablespoon of arrowroot powder (can sub with xantham gum, cornstarch or flour)

1/8 teaspoon of sea salt

1/8 teaspoon of cinnamon

1 package of ready made pie crusts–the kind you can roll not the ones in a pie tin.

directions: add the cherries, lemon juice, sea salt and sugar to a sauce pan over medium heat.

image

Cook until cherries begin to release juices, about 5-7 minutes.

image

In a small bowl mix together arrowroot and 1 teaspoon of water, add it to the cherry mixture, stir and cook until mixture thickens.

image

Remove from heat and allow to cool to room temperature. Once mixture has cooled. Pre-heat oven to the recommended temperature on the box for the pie crust you are using. Roll out your pie crusts, then cuts out your desired pie shape. I used a tarlet tin to cut out tarlet pie shapes, two circles for each pie. Fill one of the shapes for each pie with 2-3 tablespoons of the cherry filling, top it with the other pie shape, seal it by pressing the borders with a fork. Use a knife to cut a few slits on the top of the pies for ventilation. Place the pies on a silicone/parchment lined baking sheet and bake until golden brown– about 20-30 minutes.


image

Roasted Broccoli and Garlic

Roasted Broccoli and Garlic

Roasted Broccoli and Garlic


Trying to get my daughter to eat and love broccoli has not been easy.  This whole food texture thing she has is more trouble than I initially thought.  I mistakenly thought that since she loves roasted cauliflower then roasted broccoli would be a no-brainer—apparently not so with her.  Despite her refusal, this roasted broccoli and garlic dish has become a new favorite for my husband and I.  We both love it! Not only do we love it, but I served it to some friends, and they loved it too!  I’m just going to have to keep trying with my daughter, she has not been won over by a love of broccoli–yet!

Pin It!

Pin It!


Prep time: 5 minutes

Cook time: 15 minutes

Total time: 20 minutes


Ingredients:

2.5 cups of broccoli sliced

3 large cloves of garlic sliced thinly

Coconut oil spray or 3 tablespoons of olive oil

Sea salt and black pepper to taste


Directions: Pre-heat oven to 400F degrees. Line a sheet pan with foil and spray it with coconut oil. Add broccoli, and sprinkle with sliced garlic.  Season with sea salt and black pepper then spray the broccoli generously with coconut oil spray.  If using olive oil, add broccoli to a bowl with olive oil and toss until broccoli is coated, then add it to the sheet pan, sprinkle sliced garlic, season with sea salt and black pepper.

image

Place in the oven and cook for 10-15 minutes or until broccoli starts to brown a bit.  Remove from oven, serve and enjoy.

image

How to make Condensed Milk–Condensed Coconut Milk


How to make Condensed Coconut Milk

How to make Condensed Coconut Milk


It’s not often that a recipe that I concoct requires the use of condensed milk.  Condensed milk is definitely one of those products that has a very specific use.  When I was a little girl I remember looking in my grandmother’s refrigerator and always seeing a can of the Eagle brand condensed milk.  Given that the same can was always in her refrigerator, I don’t think she had many recipes that required it’s use either.  I’m not exactly sure what is in the super sweet concoction sold in the can now, but when  I was making up the recipe for my Coconut chocolate bars, I decided that I needed to prepare my own. I’ve done this with almost every kind of milk, cows, coconut, and almond.  All come out perfectly.  If you are going to do this, then I suggest doing so when you have a few hours to spend at home.  Doing this over low heat, allows you more freedom to do other things while it cooks.  If you want to speed up the process, you can use higher heat, but that will require much more from you in terms of stirring and keeping a watchful eye.

Pin It!

Pin It!


Prep time: none

Cook time: 2 hours

Total time: 2 hours

Ingredients :

2.5 cups of coconut milk (or milk)

3/4 cup of maple sugar (can use whatever sugar you’d like)

1 teaspoon of vanilla extract

2 tablespoons of butter (optional)

Directions: Add milk, and sugar to a sauce pan and simmer over low heat for 1.5-2 hours, or until the milk is reduced by half.

image

Once the milk has reduced(condensed) whisk in butter and vanilla extract. Pour into a container and let cool.

image

It will thicken on it’s own as it cools. Allow the milk to cool completely before adding it to a recipe.

image

image

Strawberry Apple Fruit-roll ups


Strawberry Apple Fruit Roll-Ups

Strawberry Apple Fruit Roll-Ups

Now that summer has arrived we are constantly on the go.  Which means that we spend much more time in the car.  My daughter does surprisingly well on car rides, however, she does better if I am armed with plenty of games to fill her time, and of course snacks don’t hurt.  She is extremely fond of apple strings–apples that I run through my vegetable spiralizer on the spaghetti attachment, however they oxidize so quickly after making them, I like to save those for home snacks.  Enter fruit roll-ups, she loves them and they are extremely travel friendly.  If you follow this blog, then you know I have several recipes for fruit rolls ups my tropical punch fruit roll-ups are my absolute favorite, but the pineapple, or strawberry fruit roll ups are equally as delicious!


Pin It!

Pin It!


Ingredients:

10 ounces of strawberries stems removed

2 medium sized apples, cores removed

Directions: Place the strawberries and apples in a blender and blend until smooth.

image

Pour the mixture out onto a parchment lined sheet and smooth into a thin layer.

image

image

Place in a dehydrator on 134 for 4-6 hours, or in a oven on the lowest setting for 4-6 hours.

image

Fruit roll-ups are done when you can peel them off of the parchment without them sticking.

image

White Bean Salad with Lemon Cumin Vinaigrette


White Bean Salad With Lemon Cumin Dressing

White Bean Salad With Lemon Cumin Dressing

This salad represents all that this blog is about.  It’s lazy in every sense of the word lazy and it’s fresh and vibrantly flavorful.  I was talking to a girl friend  of mine the other day about food and little ones.  She was in need of some advice about healthy choices for her little one. We went through the list of what she currently feeds her little one.  On her list was a simple salad of canned white beans drizzled with lemon juice and olive oil.  I thought it sounded delish, and I set out to make my own version of that salad.  I make a lentil salad that is similar to this, but I think this one is much better.  Pair this salad with a crusty piece of sourdough rubbed with a little garlic and grass-fed butter and you’ve got a rustic and delicious meal,which didn’t require you to turn on the stove.  Lazy–yes, absolutely! But it tastes anything but lazy–that counts right?;-)

Pin It!

Pin It!


Ingredients:

15 ounce can of Organic White beans (drained and rinsed)

1/2 cup of feta cheese crumbled

1/2 cup of organic rainbow radish diced

1/2 cup of cherry tomatoes quartered

1/2  cup persian cucumbers diced

1/2 cup of red bell pepper diced

1 Tablespoon of fresh organic Thyme leaves

Sea salt and black pepper to taste


Vinaigrette

5 Tablespoons of fresh lemon juice

3 Tablespoons of olive oil

1/2 teaspoon of cumin

1 medium clove of garlic finely chopped

Sea salt to taste

Directions: Add all of the ingredients except for the sea salt to a large bowl and toss well.

image

Add all the ingredients for the vinaigrette to a mason jar cover and shake until well combined.  If you don’t have a mason jar, just whisk together all the ingredients for the vinaigrette in a bowl, and set aside. Salt the salad ingredients just before serving, this will prevent the tomatoes and cucumbers from becoming soggy, toss, then drizzle with a generous amount of the vinaigrette, toss  again to combine, serve and enjoy!

Cucumber Tomato and Feta Salad with Balsamic Vinaigrette


image


Cucumber Tomato and Feta Salad with Balsamic Vinaigrette

Salads are my go to lazy girl side.  They require minimum effort and absolutely no cooking.  It doesn’t get much better than that in my book, and salads are good for you.  Salads also go with practically everything.  My husband is a big fan of salads in general, he’s one of those people who has to have a meal anchored by vegetables or he doesn’t feel like he has gotten a complete meal.  I’m like that too.  When we traveled to Puerto Rico several years ago, we were both impressed with the food: steak, chicken, rice and beans, peppers, plantains. However, the food was always missing that anchor of vegetables, which we are both accustom to.  We always asked if there was a vegetable dish that we could order to round out our meal. We never found a vegetable dish, but they always had a basic salad.

Pin It!

Pin It!


Prep time: 7-10 minutes

Cook time: none

Total time: 10 minutes


Ingredients:

1 medium cucumber sliced thinly or cubed

1/2 cup of organic cherry tomatoes sliced in half

1/4 cup of crumbled feta cheese

Ingredients Balsamic vinaigrette:

Sea salt to taste

Black pepper to taste

4 tablespoons of Balsamic vinegar

1 small clove of garlic chopped finely

3 tablespoons of olive oil


Directions: Add the cucumber and tomatoes to a medium sized bowl, top with feta and set aside. In a small bowl whisk the ingredient for the vinaigrette, spoon over the cucumber salad and enjoy!

image

Grilled Asparagus

Grilled Asparagus


Asparagus season is almost over here. If you are not paying attention the season can pass in the blink of an eye.  One of my favorite ways to make asparagus is on the grill.  The smokey flavor from the grill pairs well with the fresh crispness of this stalk green. Grilled asparagus has many fans in my house.

Pin It!

Pin It!


Prep time: 2 minutes

Cook time: 8 minutes

Total time: 10 minutes


Ingredients:

1lb of asparagus bottom stalk portion removed

1 tablespoon of coconut oil

sea salt and black pepper to taste

1 Tablespoon of fresh lemon juice


Directions:  Lay asparagus on a flat plate, drizzle with coconut oil, season with sea salt and black pepper, and roll to spread seasoning.  Place asparagus on a hot grill, and grill until done about 8 minutes. Remove from grill, drizzle with a little bit of lemon juice, or with my spicy mustard vinaigrette and enjoy!

image


Flourless Chocolate Meringue Cookies


Flourless Chocolate Merengue Cookies

Flourless Chocolate Meringue Cookies


This heat has definitely made me a Starbucks fan. Everyday I find myself going there to buy a shaken green iced tea, and since I’m there, I pick up  a treat–their flourless, gluten free, chocolate cookie. It’s probably the healthiest treat option in their refrigerated showcase, and my daughter and I love it. However, this afternoon tea and cookie thing is getting expensive, at $5 a day–$7 when we indulge at Disney–it’s getting a bit out of control. I love treating myself, but I hate mindless spending too. I’d much rather spend that $200/month on a new kitchen gadget–like a Searzall, or a chamber vacuum sealer to go along with the new immersion circulator that my husband got me for Mother’s Day.  So what’s a girl to do? Buy a box of organic green mint tea, and make the meringue cookies myself, of course!  The best thing about these cookies is that besides the cream of tar tar, I already had all of the ingredients.  These cookies are chewy, gooey and light all at the same time–just like the Starbucks cookies, but unlike the Starbucks version, these contain no added oil, so they are super low-fat, low-calorie and gluten free! Score!!!

Pin It!

Pin It!


Prep time: 10 minutes

Cook time : 10-12 minutes

Total time: 25 minutes

Ingredients:

2 egg whites

5 ounces of bitter sweet dark chocolate (60%)

1/8 teaspoon of cream of tartar

3/4 of powdered sugar(I used maple sugar see how to powder it here)

1 teaspoon of vanilla extract

1/2 cup of chocolate chips


Directions:  Pre-heat the oven to 375.  Melt the 5 ounces of chocolate in a double boiler and set aside.


image

Add the two egg whites to a stainless steel bowl and beat on low until bubbles form, add the cream of tar tar and beat on high, add in the sugar one tablespoon at a time, and beat until peaks are stiff and fluffy—-  you can turn the bowl upside down with out the mixture running.

image

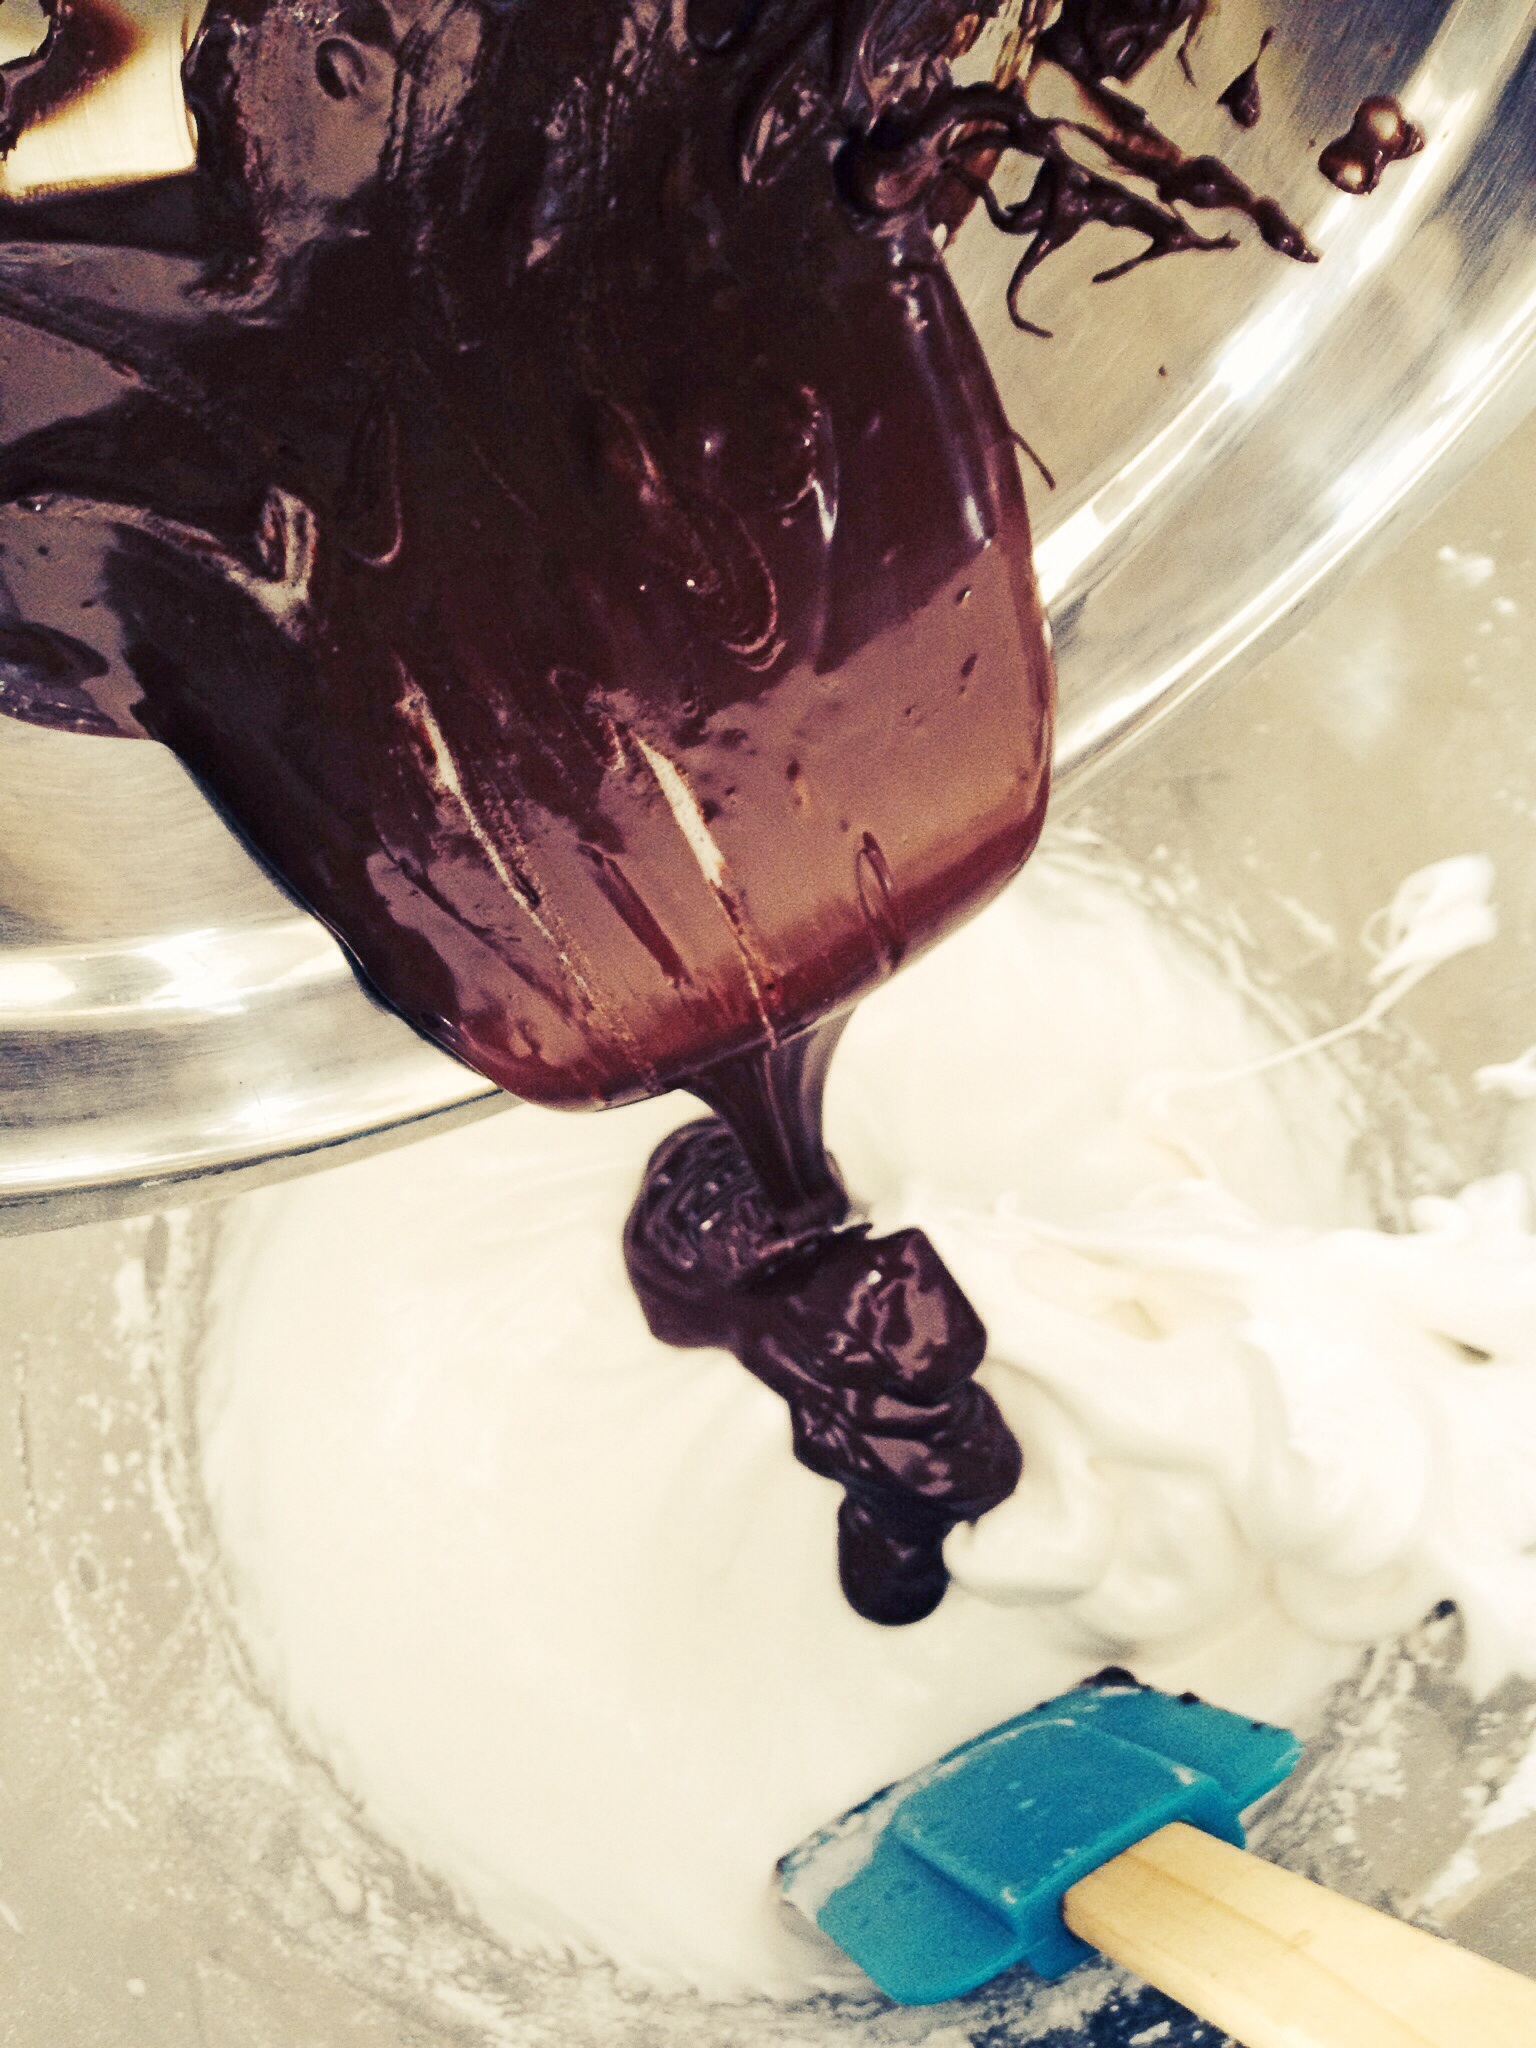
Pour in the melted chocolate and fold it into the egg white fluff–be gentle– fold until the white streaks disappear.

image

Fold in the chocolate chips, then spoon onto  a parchment lined cookie sheet.

image

Bake for 10-12 minutes, the cookies should be soft and pliable.

image

Let them cool for 10 minutes, then move them to a cookie rack to continue cooling 5-7 minutes.

image

Serve and enjoy with an ice cold glass of mint ice tea;-) Share with me some of your favorite afternoon snacks.